Showing posts with label Barbie skirt. Show all posts

Tuesday, June 11, 2024

Paper Napkin Hankie Skirt for Barbie, Kids Craft

When I started making Barbie posts back in 2013 my hope was that they'd give folks inspiration for easy, quick projects to do with kids. This hankie skirt from a paper napkin has to be one of the easiest ideas yet:@) What I love about it the most is, you can use any color or seasonal napkin you have or would like. Lunch napkins make long skirts and cocktail napkins make shorter skirts. This is an economical project for a sleepover or birthday party, and a great way to kill a little time waiting for dinner to be ready.

Of course I had to make an Eagles one too😎
This was a cocktail napkin.

What I did:
  1. Items required: Paper napkin, scissors, tape.
  2. Simply make a dot 3/4" from the corner of the napkin (the corner that would be the center of the napkin when unfolded). Note: Standard Barbie = 3/4", Curvy Barbie = 1"
  3. Draw a curve, cut the corner of the napkin off.
  4. *For the summer print napkin, I did round the corner off of the bottom too.
  5. Slip the doll's legs through the hole, scrunch napkin around her waist and tape around waist to create a waistband. The tape can be washi tape, making tape, duct tape, or anything handy.
  6. Done!

You can make any size napkin work. The lunch size makes a nice full skirt that kind of reminds me of the 1950's poodle style. You could always cut the other corners to make a rounded skirt if desired (as I did in the first picture).
Thinner, cheaper napkins work best (Walmart, Dollar Tree). I wanted to show a Christmas one too but I only had a sturdy, name brand dinner size napkin. The napkin was too big and the paper was just too thick to drape, it didn't work. $1 napkins are better!


✂Let's keep the kids busy and 
Have a Happy Day😉

Tuesday, March 12, 2024

Barbie St. Patrick's Day Crafts Round-Up (Ken too...)

I wanted to share some last minute cute ideas for Barbie Crafts for St. Patrick's Day. After all, even Barbie doesn't want to get pinched:@) Most of these crafts come together in no time, and you may even have everything you need already in your craft stash. Click the links for how-to's... St. Pat's is this Sunday folks, I expect a fun, full o' green, weekend of celebration

I love re-purposing k-cups,
this silly hat is a great kid's craft...


🍀Let's make something just for fun, and
Have a Happy Day:@)

Tuesday, November 14, 2023

Six DIY Barbie Outfits from One Roll Dollar Store Ribbon

I thought it would be fun to see how many garments I could create from one roll of Dollar store ribbon. As of this post-Six:@) And I still have a 4" piece left over... I started with a thin fabric, wired, 2.5" wide plaid that was 3 yards long. Some projects require a little sewing, some just use hot glue. This was a holiday plaid, there a tons of colors and styles to choose from. This is a long post folks, with lots of detailed directions for crafts.
The girls at the party... 
"Smile" *click*

The ribbon:

The two newest: Shawl is cut to drape over the shoulders, glue trim to the edges and top (or all the way around). I used metallic gift wrap trim, anything goes:@) The Open Front Leggins Skirt (which I love more than I thought I would) is cut 1 1/2 times as wide as the doll's waist. Gather the waist by holding the wire and gently pushing ribbon towards center on both ends. Fold wire over, hot glue craft ribbon over wire and waistband of skirt. Make the ribbon long enough to tie a bow. 

This Gathered Shoulder Party Dress only requires three pieces of ribbon, and of course any extra embellishments you have or would like... If using a plaid ribbon you may want to make sure you match the design on the two front pieces, there will be a seam down the center front of the dress. This is a little half hour project that can be created in any color, for any time of year. Check your stash, you might not even need to leave the house...
I like that in a project😉

What I did (all seams are back stitched):
  1. Cut three approximate 7 1/2 long" pieces of ribbon, pull out wire if using wired ribbon.
  2. Lay two pieces of ribbon right sides together and sew hem 5 1/2" up from bottom of dress. Repeat for the other side of the dress. I sewed as close to the edge as possible. The center piece will be the back of the dress.
  3. Fold bottom of dress over about 1/2" and sew 1/4" hem.
  4. Fold the top of all three pieces over about 1/2" and sew hems. Make the hems wide enough to feed some yarn or ribbon through the hole.
  5. Fold dress right sides together and sew hem from bottom up about 4". I sewed as close to the edge as possible. This will be the center front of the dress.
  6. Feed a piece of yarn, or something else you can gather and tie, through the two hems on the two pieces of the front of the dress. Pull each side tight to gather dress, tie. This creates the shoulders.
  7. Then I took the yarn through the corner of the back of the dress on each side, tie tight.
  8. Decorate top or side of each shoulder with bows if desired.
  9. Decorate center front of dress with bow or other embellishment if desired.
  10. Pick out ribbon for belt, I used velcro to close the belt. A belt will be needed to give the dress some shape.
  11. Dress doll, adjust dress and enjoy the party!
  12. Note: This dress will either slip up over the doll's hips or pull over her head, depending on the doll you use. Option to help make dressing easier: Don't sew one shoulder closed. Use a snap or small piece of velcro.
  13. Fits standard, belly button type Barbie's. But if you use a snap it will fit most Barbie dolls.
Barbie's Wreath = After Christmas clearance earrings.

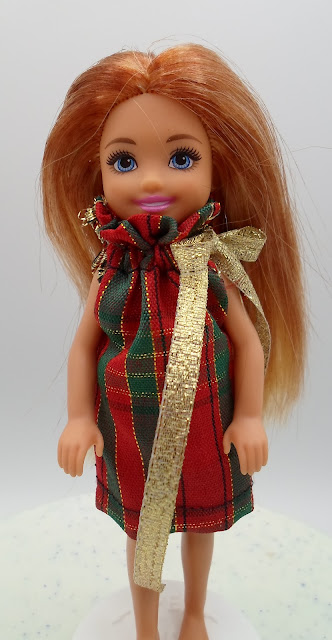
Let's not forget the kid dolls... This Gathered High Collar Party Dress for Chelsea is one of my favorites:@) I was pleased that this small dress was actually pretty easy folks! It's similar to my pillowcase dress, with the high collar being the main difference. Basically it's a tube with ribbon (or yarn) to tie it closed at the neck. Chelsea is the 5"-ish doll in Barbie's world.

What I did:
  1. Cut 2 pieces of ribbon 4 1/2" long.
  2. Pull out wire if using wired ribbon.
  3. For both pieces:
  4. Fold top over 1" to wrong side. Sew 1/4" hem from top of fold straight across ribbon. Sew a second hem below it, give yourself at least 1/4", you'll run yarn or ribbon through this channel later.
  5. Fold bottom over 1/2" to wrong side, or as much as you'd like for desired length of the dress. Sew 1/4" hem.
  6. Place pieces right sides together. Sew hem from bottom up sides, stop about 1 1/4" from the top. Sew both sides. Mine was about 1/4", can sew closer to the sides for a wider dress.
  7. Turn right side out. 
  8. Thread 12" yarn or thin ribbon onto needle, feed through the channel we made at the top. Go through the front piece, then through the back piece. This leaves two loose ends of yarn/ribbon. 
  9. Dress doll from feet first. Place arms between where seam stops and ribbon starts. Pull both ends of the ribbon, scrunch the fabric together creating the collar, then tie the dress closed with a bow on the side of the neck.
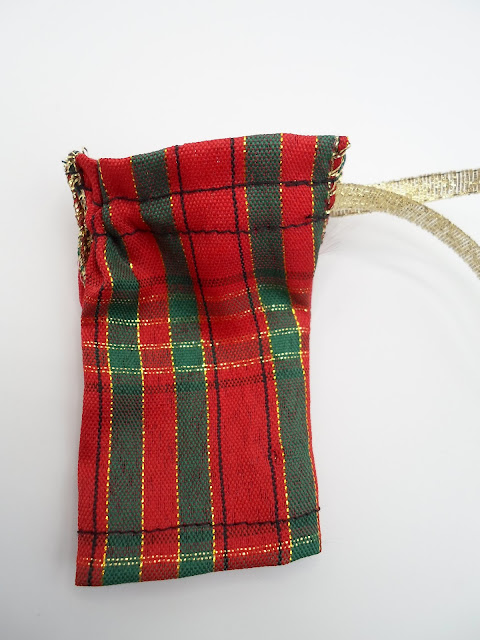
Chelsea says, every girl likes to have a pretty party dress😎

I love the look of this Fancy One Shoulder Ribbon Top for Barbie! This is a no-sew project that literally comes together in minutes, two cuts, two folds, two twists, a little hot glue and you're dressing the doll:@) While I love the holiday colors in this top, plaid always presents challenges for garments... I think a solid color or one with stamped designs might work best. I used a snazzy metallic tinsel ribbon from my stash for the waist band, if you want something blingy that's still easy to find today, diamond mesh ribbon would be fun. 

What I did:
  1. Cut a piece of 2 1/2" wide thin ribbon 7" long. I used the same wire edged ribbon that I made a dress out of here.
  2. Fold the edges over 1/2" on both cut ends, fold to back of ribbon. You can glue them down, I just folded the wire over.
  3. Scrunch up the ribbon at the center point and completely twist it around twice, this is what goes over the doll's shoulder. You'll want the right side of the ribbon to show on both the front and back of the shirt.
  4. Cut 4 1/2" of ribbon for the waistband. Glue one piece of velcro to the right edge of the ribbon. This blouse will open/close on the side for dressing the doll.
  5. Glue the right edge of the waistband to the bottom of the blouse front, but leaving the velcro hanging over side of ribbon (see picture below). My ribbon has the tinsel in the center, that's what I glued to the bottom of the blouse. You can see the pretty lace showing on the doll's skirt.
  6. Overlap the two edges of the ribbon about 1/4" (center point of picture below), glue back piece to waistband. 
  7. Glue other piece of velcro to the other end of waistband (making sure the two edges will stick together).
First piece of velcro hanging over right side.


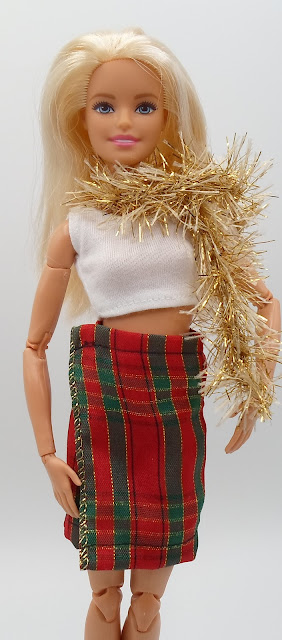
This idea is super simple, a very basic, Wrap Skirt that takes about 10 minutes to make. I also like that this idea only calls for five straight seams, making it a nice easy project for young sewers. Again, plaid can sew-up a little wonky and if you're like me, it might bug you that the lines aren't always exactly straight. Solid or stamped pattern is best.
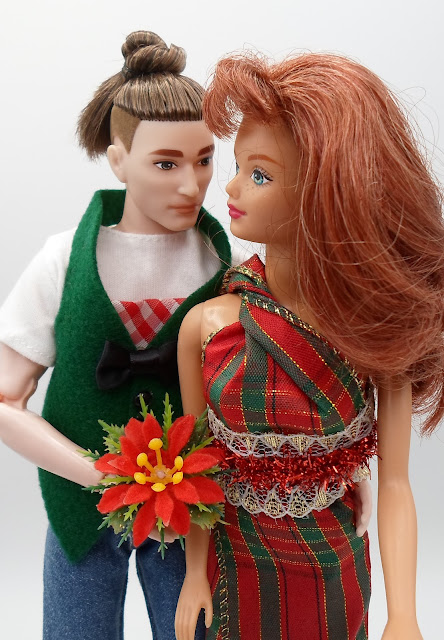
I like this picture and wanted to share a sweet moment between the dolls😉 They look like the best dressed couple at the Christmas party this year! And you could use a little piece of the plaid ribbon as the insert on Ken's vest too... How to make a no-sew holiday felt vest for Ken here.

Here's a shot of the skirt:
Sparkly scarf = Eyelash yarn, large crochet hook and loose chain stitch.

What I did (all seams are back stitched):
  1. Cut three pieces of 4 1/2" long ribbon (my ribbon is thin, somewhat sheer and 2 1/2" wide). Pinking shears would help control fraying.
  2. Pull out wire if using wired ribbon.
  3. Lay two pieces of ribbon right sides together and sew 1/4" hem up long side of skirt. Repeat for the other side of the skirt. The center piece will be the back of the skirt.
  4. Fold bottom of skirt over about 1/2" and sew 1/4" hem.
  5. Fold top of skirt over about 1/2" and sew 1/4" hem. Please see pic below.
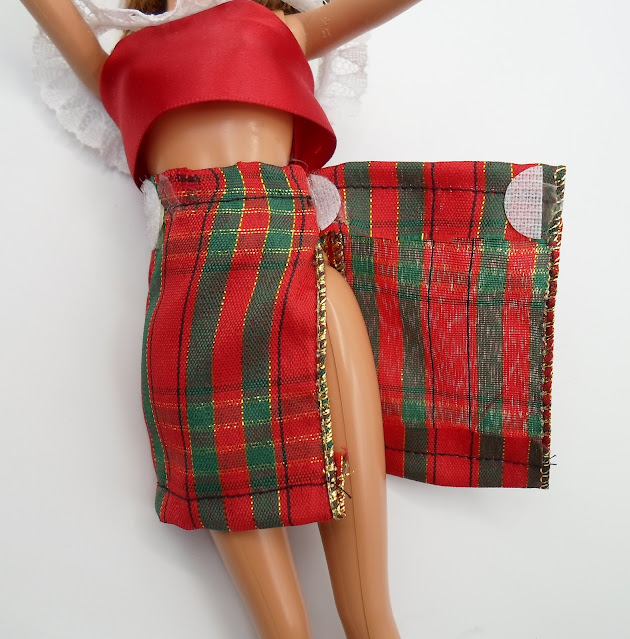
  6. Glue velcro closure for waist in two spots. It's best to just gauge where this should be by wrapping the skirt around your doll. One closure where the ribbon meets around the waist the first time, then another piece to secure the double wrapped flap. I used Dollar Store velcro, if you have a thinner velcro more suited to doll clothes it would lay flatter at the waist. Please see pic below.
Sewn together:
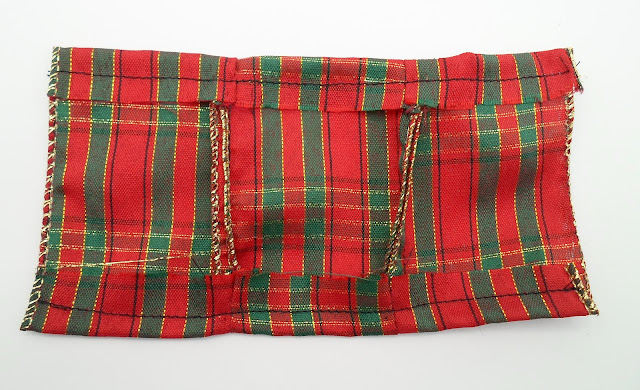
Velcro placement:
Wrap around doll-done:@)

So there you have some ideas to help fill a rainy afternoon, or a few days off from school. I'm sure your girl would love to pick out some pretty ribbon, and help create a wardrobe for Barbie!

✂Make something just for fun, and
Have a Happy Day:@)

Saturday, November 27, 2021

ReView: Old Fashioned Gingerbread, Barbie Outfit from $1 Socks, and a Christmas question...

As the holiday season officially kicks off, I have a bit of a conundrum folks... I spent yesterday putting up a new Christmas tree, and I don't like it. Ugh. So, do I spend this Christmas with that tree, or look for another one and redecorate for this year? Certainly not the biggest problem to have, but I know I won't be using this tree again next year! Oh well, you know what I do like? This great recipe for Old Fashioned Gingerbread! This can be a cake or cupcakes, and the recipe is easily cut in half. A simple cream cheese frosting is literally the perfect icing on the cake for this seasonal treat:@)

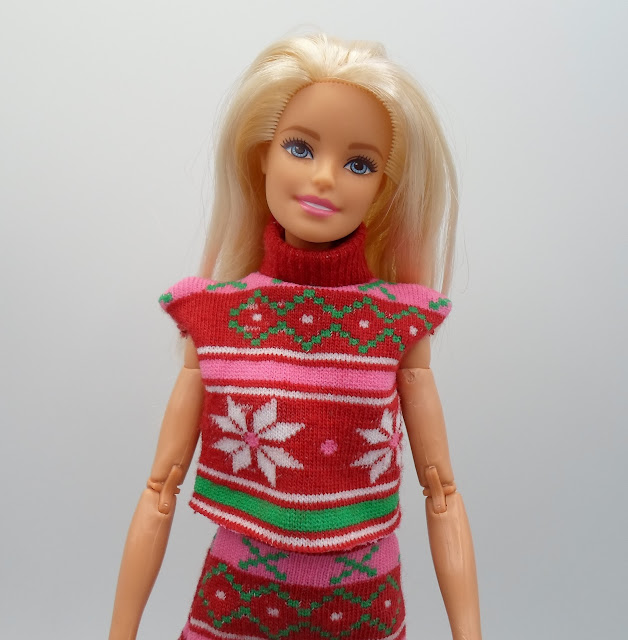
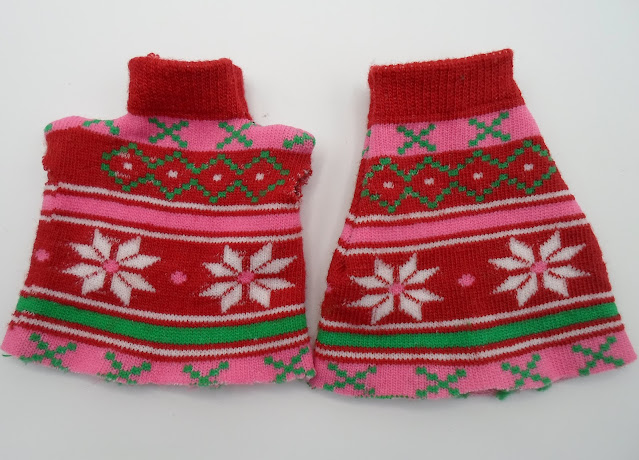
Let's get Barbie ready for the holidays too... We took some Dollar Tree socks and created a short sleeved Turtleneck Top and Matching Sweater Skirt. This project only requires four seams, a couple cuts and about 15 minutes of your time:@) You could always hem the top and skirt too if desired. My favorite part is the fabulous turtleneck collar!

This was how it looked when I was done...
I decided the pink on the bottom of the shirt needed to be trimmed.
It looks much neater in the picture above.
As always, a solid or abstract pattern might be best so the design placement doesn't matter. But overall, I think it turned out pretty well😉

✂What I did:
Skirt: Seams are pretty straight forward, pic on left. 
(After sewing the one on the right I decided I wanted the waist band to be a little tighter, 
that's why there are two seams shown.)
Top: Sew straight down the elastic band, 
come down ~below~ the band and sew at a right angle over to the sides.
Be sure to back stitch all seams.

Cut each piece as shown, and add a small arm hole on each side a little below the shoulder seams.

Hem bottoms if desired.
Turn right side out, push shoulder seams out to the sides creating right angles.
Dress doll, and smile!
This could be a fun sleepover craft, let the girls pick out their socks and then you can be a rock star and make the clothes:@) Or how about giving your girl a pair of socks and Barbie outfit that matches...


Happy decorating and have a great weekend:@)

Saturday, July 3, 2021

Barbie Wrap-Skirt and No-Sew Patriotic Clothes Free Patterns & Cream Cheese Message Brownies

This Wrap Skirt for Barbie has a no-sew option, truly making it simple for girls to make for themselves. This looks a little more finished than my Barbie tunic top and Ken tank top because we glue (or sew) trim around the bottom edge. But it's still the same theory, we don't really need hems because we're using pinking shears. This is a super simple 15-30 minute project that's a great way to add to Barbie's wardrobe while doing a little stash busting at the same time.

And a totally different look...
A word about glue: I absolutely love Liquid Stitch, 
but recently I've been using Aleene's Turbo Tacky Glue for these crafts. 
It seems to adhere quicker and dry faster. 
Almost finished skirt, only needs snaps or velcro...

The pattern:

What I did:
  1. Cut one with pinking shears.
  2. Fold top (waist) over 1/4" and glue or sew.
  3. Glue or sew sewing trim from rounded side of waist around bottom to the other side. Leave flat side unfinished (see picture above). Note: The rick-rack did ~not~ want to adhere with glue, I sewed that on. The delicate lace glued just fine.
  4. Sew snaps or hot glue/sew velcro dots for closure. My dots on the pattern are just estimates, it's always best to have your girl's favorite doll close by for fittings. My best tip: You'll either want to add the closure so the waistband stays tight to hold up the straight edged side, or add a second snap or tad of velcro to that side too. 
  5. To dress doll, hold straight side of skirt against side of doll's hip. Wrap skirt all the way around doll, overlapping fabric in front, and snap closed.
  6. Smile at a half hour well spent😉
Oh how I wish this rick-rack was red...

How to make a No-Sew Ribbon Bathing Suit here & Swing Top here:

If you're looking for an easy and fun patriotic dessert for your 4th of July celebration this year, 
may I suggest these Cream Cheese Message Brownies
I simply used a store bought brownie mix, whipped up some cream cheese 'paint' and, wa-la, 
we have a festive and colorful treat! 
And of course a few sprinkles never hurt anything:@)

Happy 4th of July Weekend Everyone!
Make it a great one:@)

Saturday, May 15, 2021

Saturday ReView: Easy Three Seam Barbie Skirt & Sesame Grilled Pork Tenderloin

These simple Three Seam Elastic Waist Barbie Skirts whip up in no time! I've made a couple and think I might make more in solid colors so they go with any top or occasion, if you're trying to build an inexpensive doll wardrobe, this is a nice way to start. What I love about this most is, it only requires a 6" x 3-4" piece of scrap fabric. The variation being, you can make the skirt as long, or short, as you'd like (or using whatever amount of fabric you have for the length).

Supplies:
6" x 4" rectangle of thin fabric
4" long piece of 1/4" wide elastic

What I did:
  1. Fold top and bottom (6" sides) of fabric over about 1/4", crease with nail or iron.
  2. Sew 1/4" bottom hem.
  3. Pin elastic to center, then to each side of folded top.
  4. Place one end of elastic under presser foot, lower needle, Stretch elastic with both hands and stitch, removing pins before you get to them if desired. Ideally we'd use a zig-zag stitch which creates a waistband of sorts. If you're having difficulty with the zig-zag stitch (and I did), a straight stitch will work fine for this small doll garment.
  5. Fold so right sides are together and sew 1/4" back seam (creating a tube shape), back stitch top and bottom.
I think this pic gives a good idea of the procedure:
Bottom seam, stretch elastic and sew, then just fold in half and sew wrong sides together to create the skirt.
Turn right side out-done😀

I used the zig-zag stitch for the waistband on this one:

And this Grilled Sesame Pork Tenderloin goes way back to the early days of Pig In Mud:@)
The marinade is fantastic and it goes equally well with chicken, and I hear it's great with beef too.
I also share an extra flavorful tip that really works!

Let's fire up the grill and have a happy weekend:@)

Saturday, February 20, 2021

Saturday ReView: High Waisted Barbie Skirt Free Pattern & Bread Machine Carrot Onion Dill Bread

I have a military background and a soft spot for OD green and camouflage fabric:@) I fell in love with the ruffled top of the skirt in the Mattel fashion pack below as soon as I saw it, and thought it looked like an easy DIY project. Actually, this is a simple modification of my three seam elastic waist skirt. It's a mid calf length skirt and the cute part is that the waist is ruffled upward, perfect for a tucked in, or preferably, a short-short cropped top. And of course you could use any fabric color or print desired. 

My inspiration:
Now, if you have the patience, you can certainly add the white thread pocket seams like Mattel's. 

What I did:
6" x 7" rectangle of fabric, mine was cotton from Walmart, I used pinking shears.
4" piece of 1/2" wide elastic.
Fold bottom (6" side) over 1/4", crease with fingernail or iron, and sew seam.
Fold top (6" side) over 1", crease with fingernail or iron.
Pin center of elastic to bottom center of waist (see below).
Stretch elastic to the edge of each side, sew one seam about 1/8" from bottom of elastic, then sew a second seam about 1/8" from top of elastic. This creates the two seams around the waistband.
Fold skirt right sides together, sew 1/4" seam up the back of the skirt, backstitch top and bottom.
Turn right side out, done.

This fits standard Barbie dolls.

Barbie is texting everyone, it's easy to make and she loves her new skirt😎

Are you looking for a new bread machine recipe to try? This Carrot Onion Dill Bread is bursting with flavor and has the added bonus of being very pretty too! I've made this several times (and it may be on the menu for dinner tomorrow:@) and we all really love it. Poppy seeds are a great addition too, if you have some. You can click the link for a traditional recipe to bake in the oven as well.

Make something just for fun, stay warm, and have a great weekend:@)

Sunday, December 1, 2013

Barbie clothes from $1 socks, five garments from one pair-tutorial

I'm sure we've all seen Barbie Clothes Made From Socks before, but as soon as I saw these cute Santa socks at Dollar Tree I had to whip some up! A pair of size 6-10 socks will give you two dresses (oh yea, I'm good with math like that:@) But the challenge was to use up the leftover fabric too...
I ended up with two dresses, a skirt, a tube top and my personal favorite-a pair of adorable cropped pants!

Any hems are hand sewn 1/4". You don't need to hem everything, only if you're concerned about the fabric rolling up.
Simplest Short Dress:
  1. Cut sock straight across above the heel.
  2. Cut a small hole (maybe 1/4") just under the band at the top so one arm can slip through. Try to make the hole so the design (Santa in this case) is in a good position in front of the dress. 
  3. Hem the bottom. 
  4. Adding a belt helps give it some definition and fit better. I used a thin hairband, ribbon would be cute too. 
Fancy Gown Version:
  1. Cut sock straight across above the heel.
  2. Sew fancy trim to bottom of sock: lace, fringe, a ruffle, anything dangley and long that brings it close to floor length. I hand sewed the fringe on.
  3. Gather the top front of the band in two pleats and sew it securely. Add something sparkly and blingy there. 
  4. Any other embellishments are up to you, sew or glue on sequins, beads or add some glitter if you'd like.
Skirt From Leftover Foot:
  1. Cut off the heel and toe creating a straight tube. 
  2. Fold waist over and sew elastic (I used a thin hairband) into waistband. 
  3. Add a hem to the bottom of the skirt.
Tube Top From Leftover Heel: 
  1. Take the leftover heel (from the skirt) and gently stretch it to the sides. This will roll the top and bottom. 
  2. Cut the back open, fit it around the doll, cut off excess material.
  3. Sew on velcro or snaps for closure.
Cropped Pants From Leftover Foot:
  1. Cut off the heel and toe creating a straight tube keeping it as long as you can. 
  2. Gently turn fabric inside out. Using the fold on the top of the foot as a guide, make that the center front of your pants and sew up the inside of each leg to crotch-make the crotch seam a little bit square (I used two stitches across). Be sure to leave yourself a good 1 1/2" from the crotch to the waist. The idea for the inseam is to leave enough room to cut between the two legs. 
  3. Sew side seam from top of waist (about 1/2" in from sides) to outside of pant leg about even with the crotch. You want it snug but with enough stretch to fit over her hips. Trim the excess fabric. 
  4. Turn inside out.
  5. I made the waist high enough that it will be hidden by whatever (normal length) top the doll is wearing and I think the inseam stitches will help the bottom of the pants not roll up much. That was how I left my pants. You however, could fold and hem the waist and leg holes, or cut the center back open, fold all loose edges, sew in velcro and create a waistband... Or do any number of things to give the pants a more "finished" look-have fun! 
So there you have it folks, five totally different looks from one pair of $1 socks.

And I think the Crochet Santa Hat HERE would be really cute with the pants or skirt!

Have a happy day:@)

I'm Joining:
Christmas Wonderful Link Party