I thought it would be fun to see how many garments I could create from one roll of Dollar store ribbon. As of this post-Six:@) And I still have a 4" piece left over... I started with a thin fabric, wired, 2.5" wide plaid that was 3 yards long. Some projects require a little sewing, some just use hot glue. This was a holiday plaid, there a tons of colors and styles to choose from. This is a long post folks, with lots of detailed directions for crafts.
The girls at the party...
"Smile" *click*

The ribbon:

The two newest: Shawl is cut to drape over the shoulders, glue trim to the edges and top (or all the way around). I used metallic gift wrap trim, anything goes:@) The Open Front Leggins Skirt (which I love more than I thought I would) is cut 1 1/2 times as wide as the doll's waist. Gather the waist by holding the wire and gently pushing ribbon towards center on both ends. Fold wire over, hot glue craft ribbon over wire and waistband of skirt. Make the ribbon long enough to tie a bow.

This Gathered Shoulder Party Dress only requires three pieces of ribbon, and of course any extra embellishments you have or would like... If using a plaid ribbon you may want to make sure you match the design on the two front pieces, there will be a seam down the center front of the dress. This is a little half hour project that can be created in any color, for any time of year. Check your stash, you might not even need to leave the house...

I like that in a project😉
What I did (all seams are back stitched):
- Cut three approximate 7 1/2 long" pieces of ribbon, pull out wire if using wired ribbon.
- Lay two pieces of ribbon right sides together and sew hem 5 1/2" up from bottom of dress. Repeat for the other side of the dress. I sewed as close to the edge as possible. The center piece will be the back of the dress.
- Fold bottom of dress over about 1/2" and sew 1/4" hem.
- Fold the top of all three pieces over about 1/2" and sew hems. Make the hems wide enough to feed some yarn or ribbon through the hole.
- Fold dress right sides together and sew hem from bottom up about 4". I sewed as close to the edge as possible. This will be the center front of the dress.
- Feed a piece of yarn, or something else you can gather and tie, through the two hems on the two pieces of the front of the dress. Pull each side tight to gather dress, tie. This creates the shoulders.
- Then I took the yarn through the corner of the back of the dress on each side, tie tight.
- Decorate top or side of each shoulder with bows if desired.
- Decorate center front of dress with bow or other embellishment if desired.
- Pick out ribbon for belt, I used velcro to close the belt. A belt will be needed to give the dress some shape.
- Dress doll, adjust dress and enjoy the party!
- Note: This dress will either slip up over the doll's hips or pull over her head, depending on the doll you use. Option to help make dressing easier: Don't sew one shoulder closed. Use a snap or small piece of velcro.
- Fits standard, belly button type Barbie's. But if you use a snap it will fit most Barbie dolls.

Barbie's Wreath = After Christmas clearance earrings.
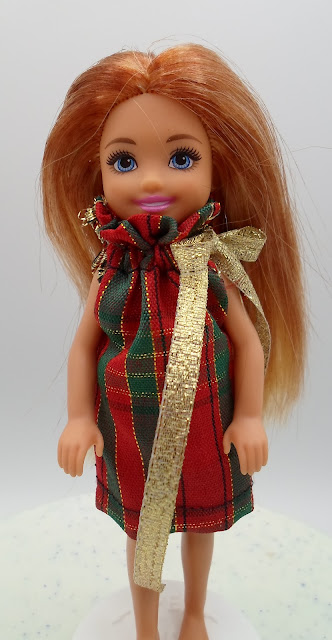
Let's not forget the kid dolls... This Gathered High Collar Party Dress for Chelsea is one of my favorites:@) I was pleased that this small dress was actually pretty easy folks! It's similar to my pillowcase dress, with the high collar being the main difference. Basically it's a tube with ribbon (or yarn) to tie it closed at the neck. Chelsea is the 5"-ish doll in Barbie's world.
What I did:
- Cut 2 pieces of ribbon 4 1/2" long.
- Pull out wire if using wired ribbon.
- For both pieces:
- Fold top over 1" to wrong side. Sew 1/4" hem from top of fold straight across ribbon. Sew a second hem below it, give yourself at least 1/4", you'll run yarn or ribbon through this channel later.
- Fold bottom over 1/2" to wrong side, or as much as you'd like for desired length of the dress. Sew 1/4" hem.
- Place pieces right sides together. Sew hem from bottom up sides, stop about 1 1/4" from the top. Sew both sides. Mine was about 1/4", can sew closer to the sides for a wider dress.
- Turn right side out.
- Thread 12" yarn or thin ribbon onto needle, feed through the channel we made at the top. Go through the front piece, then through the back piece. This leaves two loose ends of yarn/ribbon.
- Dress doll from feet first. Place arms between where seam stops and ribbon starts. Pull both ends of the ribbon, scrunch the fabric together creating the collar, then tie the dress closed with a bow on the side of the neck.
Chelsea says, every girl likes to have a pretty party dress😎

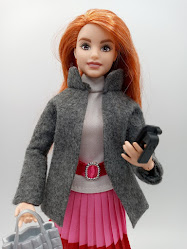
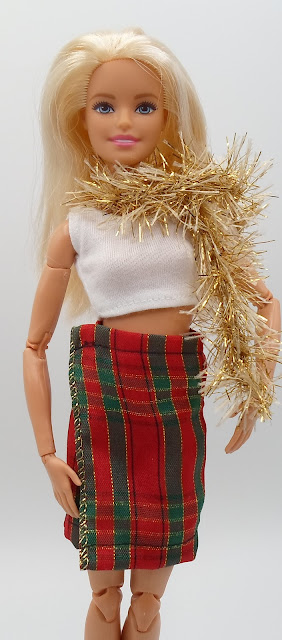
I love the look of this Fancy One Shoulder Ribbon Top for Barbie! This is a no-sew project that literally comes together in minutes, two cuts, two folds, two twists, a little hot glue and you're dressing the doll:@) While I love the holiday colors in this top, plaid always presents challenges for garments... I think a solid color or one with stamped designs might work best. I used a snazzy metallic tinsel ribbon from my stash for the waist band, if you want something blingy that's still easy to find today, diamond mesh ribbon would be fun.

What I did:
- Cut a piece of 2 1/2" wide thin ribbon 7" long. I used the same wire edged ribbon that I made a dress out of here.
- Fold the edges over 1/2" on both cut ends, fold to back of ribbon. You can glue them down, I just folded the wire over.
- Scrunch up the ribbon at the center point and completely twist it around twice, this is what goes over the doll's shoulder. You'll want the right side of the ribbon to show on both the front and back of the shirt.
- Cut 4 1/2" of ribbon for the waistband. Glue one piece of velcro to the right edge of the ribbon. This blouse will open/close on the side for dressing the doll.
- Glue the right edge of the waistband to the bottom of the blouse front, but leaving the velcro hanging over side of ribbon (see picture below). My ribbon has the tinsel in the center, that's what I glued to the bottom of the blouse. You can see the pretty lace showing on the doll's skirt.
- Overlap the two edges of the ribbon about 1/4" (center point of picture below), glue back piece to waistband.
- Glue other piece of velcro to the other end of waistband (making sure the two edges will stick together).
First piece of velcro hanging over right side.


This idea is super simple, a very basic, Wrap Skirt that takes about 10 minutes to make. I also like that this idea only calls for five straight seams, making it a nice easy project for young sewers. Again, plaid can sew-up a little wonky and if you're like me, it might bug you that the lines aren't always exactly straight. Solid or stamped pattern is best.
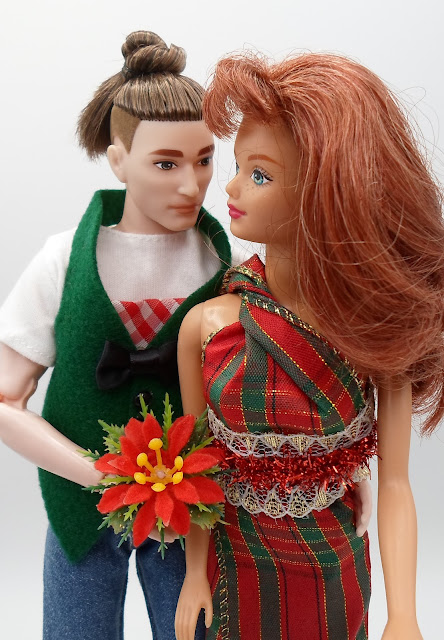
I like this picture and wanted to share a sweet moment between the dolls😉 They look like the best dressed couple at the Christmas party this year! And you could use a little piece of the plaid ribbon as the insert on Ken's vest too... How to make a no-sew holiday felt vest for Ken here.
Here's a shot of the skirt:
Sparkly scarf = Eyelash yarn, large crochet hook and loose chain stitch.
What I did (all seams are back stitched):
- Cut three pieces of 4 1/2" long ribbon (my ribbon is thin, somewhat sheer and 2 1/2" wide). Pinking shears would help control fraying.
- Pull out wire if using wired ribbon.
- Lay two pieces of ribbon right sides together and sew 1/4" hem up long side of skirt. Repeat for the other side of the skirt. The center piece will be the back of the skirt.
- Fold bottom of skirt over about 1/2" and sew 1/4" hem.
- Fold top of skirt over about 1/2" and sew 1/4" hem. Please see pic below.
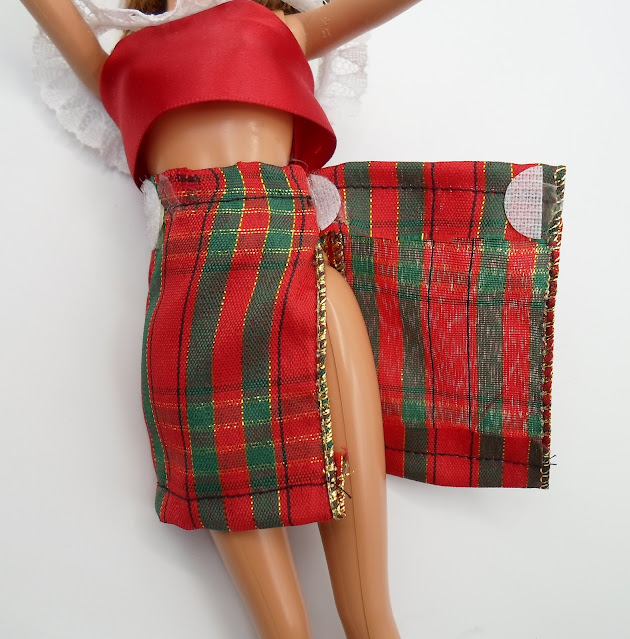
- Glue velcro closure for waist in two spots. It's best to just gauge where this should be by wrapping the skirt around your doll. One closure where the ribbon meets around the waist the first time, then another piece to secure the double wrapped flap. I used Dollar Store velcro, if you have a thinner velcro more suited to doll clothes it would lay flatter at the waist. Please see pic below.
Sewn together: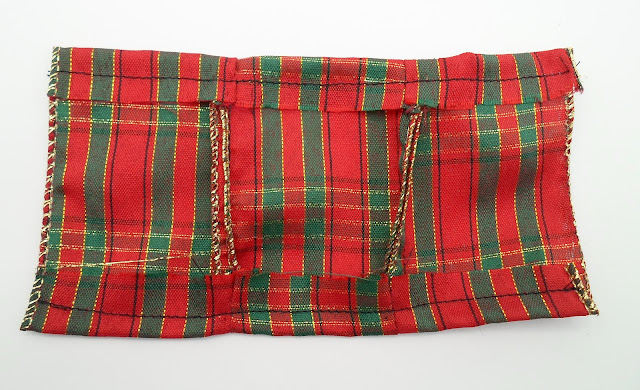
Velcro placement:
Wrap around doll-done:@)
So there you have some ideas to help fill a rainy afternoon, or a few days off from school. I'm sure your girl would love to pick out some pretty ribbon, and help create a wardrobe for Barbie!
✂Make something just for fun, and
Have a Happy Day:@)