Thursday, March 6, 2014

German Apple Cake

I've made this German Apple Cake a few times now, it tastes great and I love that it doesn't make a huge cake, it's maybe only 1" thick. The recipe calls for 3-4 apples and without planning ahead I usually only have 2 large ones so that's what I use. While they may be snuggled up all cozy together before baking... Once the cake puffs up that extra apple would be nice! It's still very tasty though:@)

Note: The original recipe calls for a lot of sugar, you have plenty of room to cut back.
Pin It
German Apple Cake-adapted from A Spoonful of Sugar
1/2 C butter, softened
1 C sugar-I use 1/2 C
2 eggs
1 C A/P flour
1 tsp baking powder
1 tsp vanilla
1/3 C sugar-I used 1 1/2 Tblsp
1 tsp cinnamon
3-4 large apples, peeled, cored and sliced-I used 2 large apples
  1. Cream the butter and sugar, mix in the eggs.
  2. Mix in the dry and spread the batter into a greased 9" spring form pan (batter will be thick). I only have an 8" pan so that's what I used.
  3. Mix the additional sugar and cinnamon with the apples and arrange them in a circular pattern over the batter. You should have an outer ring and an inner ring. Press the apples into the batter lightly. I just arrange the apples and sprinkle the cinnamon/sugar over them. I usually end up with leftover broken little bits of apple too so I pile them into the center.
  4. Bake at 350 degrees for approximately 50-60 minutes. 
  5. Cool completely and traditionally it's served with a dusting of powdered sugar.
Happy Baking Everyone:@)

I'm Joining:
Full Plate Thursday
Foodie Friday

Tuesday, March 4, 2014

Quick Asparagus and Leftover Rice Soup for One

Asparagus was beautiful at the store the other day so I grabbed a bunch. Came home and roasted some with potatoes for a quick dinner then decided to make a bowl of soup with about eight medium sized uncooked spears for lunch. This Asparagus with Rice Soup was a very pleasant surprise and something I wouldn't hesitate to make again! The big flavor boost came from bacon fat (surprise! :@)
Pin It
Once again this isn't so much a recipe as a suggestion to use your leftovers, cooked or uncooked, in ways that turn them into something new. Also, treat yourself well! I wouldn't hesitate to take 30 minutes to create a healthy, whole foods lunch for myself. This soup was truly the highlight of my work day!

Quick Asparagus and Leftover Rice Soup for One
2 Tblsp onion, small dice
2 tsp bacon fat-olive oil would be fine
1 clove garlic, minced
1/2 C water
1 tsp Chicken Better Than Bullion
Approx 8 spears of asparagus, washed, bottoms snapped off, tips reserved, stalks ground up
Fresh ground pepper
Approx 3/4 C milk-start with less and add more depending on how loose you want your soup
Approx 1/3 C Leftover cooked rice-I used Mexican Rice because that's what I had on-hand
  1. Saute onion in fat for 5 minutes in 2 quart pot.
  2. Add garlic, cook for 1 minute.
  3. Add water, chicken base, ground up asparagus (I used my food chopper) and some black pepper. Bring to a boil and reduce to low simmer for about 15 minutes.
  4. Add tips of asparagus and rice, bring to a quick boil and down to simmer.
  5. Add milk and bring back to a simmer. Adjust S&P.
  6. *Now, at this point if you are taking this for lunch in a thermos or plan to reheat later you are done. If you're eating it right away cook for a few more minutes until the tips are tender. If it's not thick enough for you, add a little flour to milk and thicken it up. 
Eat well and have a happy day:@)

I'm Joining:
Full PlateThursday
Foodie Friday

Monday, March 3, 2014

Happy Mardi Gras! Barbie Mardi Gras Masks DIY

These Mardi Gras Masks for Barbie are a fun little project that can be as simple, or extravagant, as your imagination (and craft supplies) allow! They start with a pipe cleaner and then can be embellished with anything, more pipe cleaners, feathers, ribbon, beads, foam cutouts, sequins, etc. I made one that gets held in Barbie's hand like opera glasses and one that sits on her face like reading glasses. My picture tutorial shows how to make the reading glasses, but they are both similar. Ken's selfie of the girls sitting on his lap...

  Looks like the girls are all set for some fun during the Mardi Gras parade too😎

A close-up of the mask detail:
I started with the green glasses and glued the purple and gold on.

 And the second one...
Gold glasses with gold, purple and green feathers and a heart rhinestone glued on.

Mardi Gras Mask for Barbie:
Create the top of the frame of glasses by bending both sides of the pipe cleaner down at 90 degree angle.
The center should be about 1 1/2-1 3/4" long. 
Having a doll handy is helpful, hold the pipe cleaner up against her face to gauge the size of the glasses.

 Begin to shape the lens of the glasses.
I wrapped it around my finger, then twisted the pipe cleaner up over the top of the frame. 
You can see the excess sticking out to the right, that will be the part that goes over her ear.
Do the same for the other lens.

 At this point the mask looks like glasses😎

   Bend the two sides back so they slide over her ears. 
~Or~ leave them long so a girl can twist them behind the dolls head so they stay on better while playing.

Decorate the mask any way you'd like. 
I wanted to show you how I make Barbie size feathers from craft feathers: 
Simply cut the tip off and trim as necessary.

Hot glue works best (and the fastest) for sticking items to the mask.

And finally...
Ken says: Remember, what happens in Nawlins, stays in Nawlins😃

Enjoy the festivities this year folks, but Earl sends his little reminder...
What happens at Mardi Gras...
Doesn't always stay at Mardi Gras!

Have a happy day:@)

Saturday, March 1, 2014

Mardi Gras Dyed Deviled Eggs

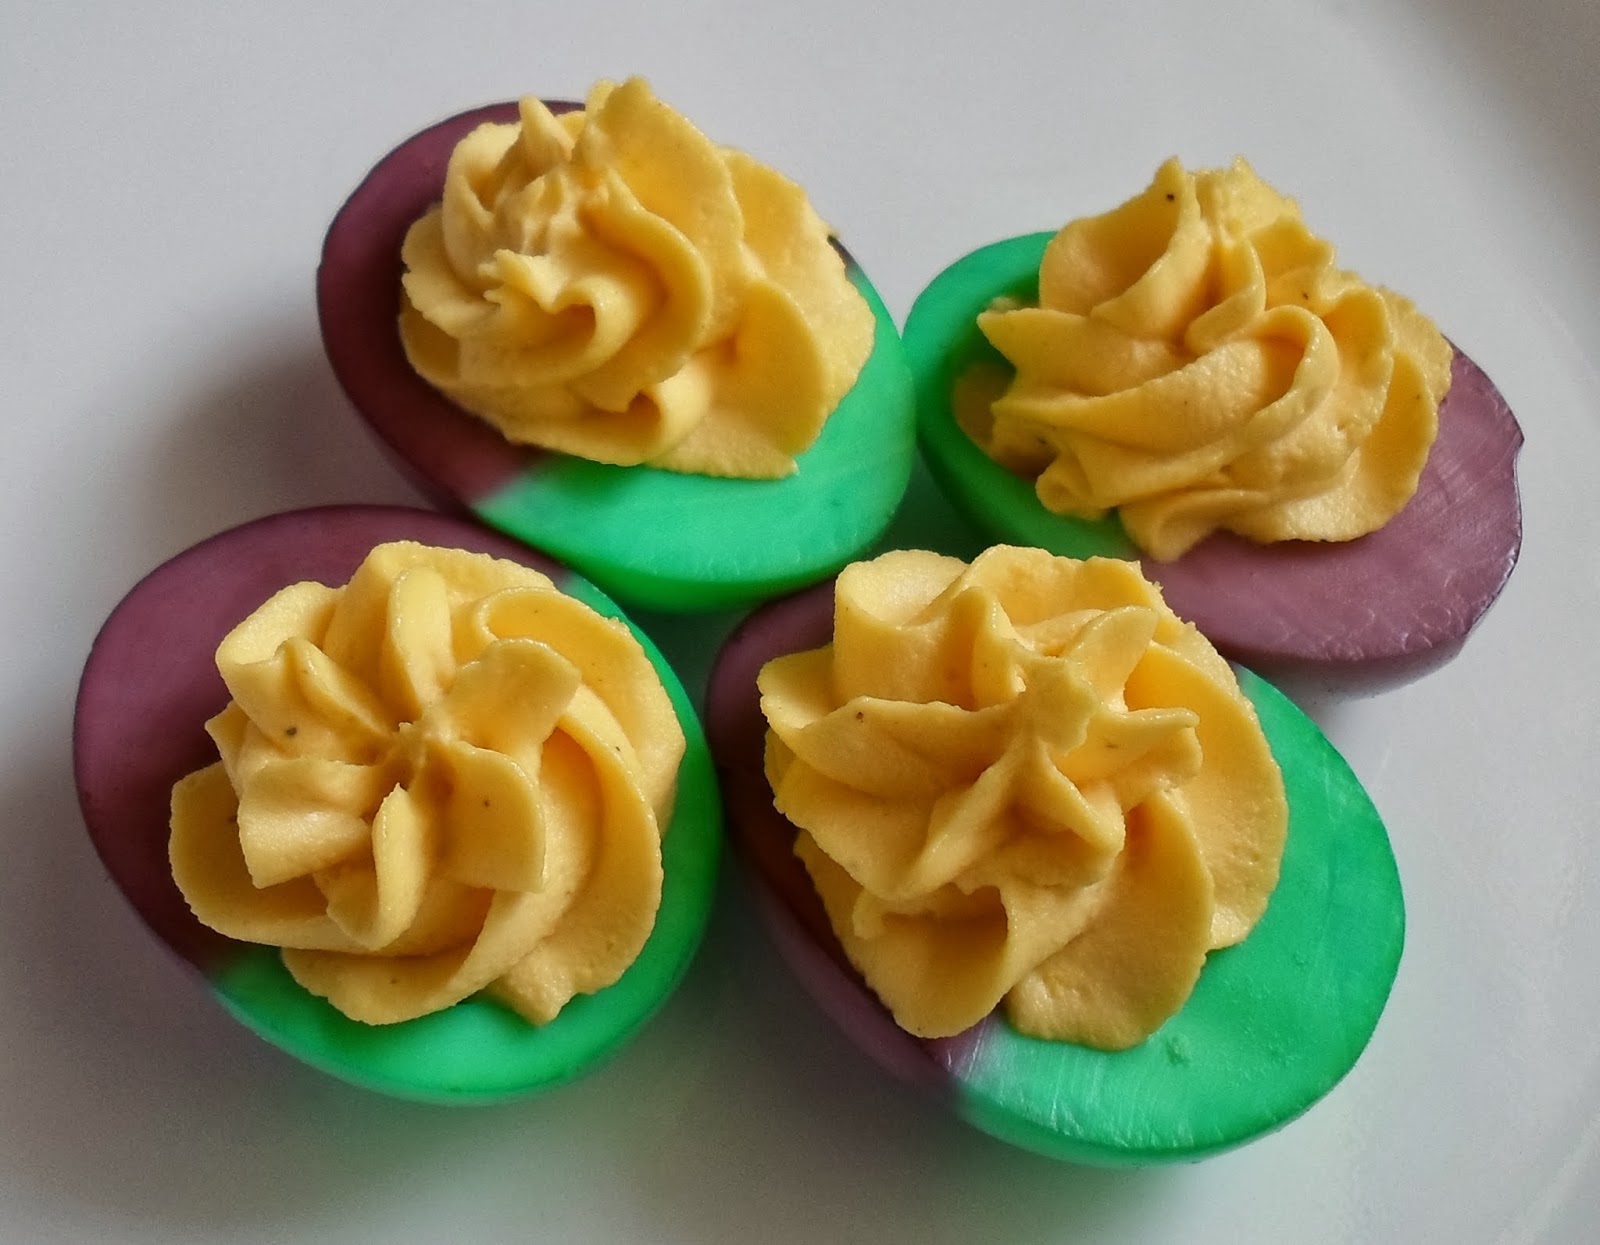
Have you heard there's this little party going on down south, I believe it's called Mardi Gras... I'm planning a themed dinner so I thought I'd add these Mardi Gras Dyed Deviled Eggs to the menu! Simply use food coloring and dip half of each peeled egg into green and the other half into purple, the gold kinda takes care of itself:@) Use your favorite deviled egg recipe and you're all set!
Pin It
I use 1 tsp vinegar, 1/2 C warm water and about 20 drops of food coloring for each color.
Dip them until you get the desired color. After each dipping I turned them upside down on a paper towel to drain.
I'll be honest and say purple isn't an easy color folks. For every 10 drops of red add 2-3 of blue. Mine kinda looked brown so I read to add a pinch of baking soda and did... figured it couldn't hurt.
For the best coloring, these eggs should be served the day they're made.

Have a happy day and laissez-les-bons-temps-rouler:@)

I'm joining:
Seasonal Sunday
A Round Tuit
Craftastic Monday

Friday, February 28, 2014

French-ish Pickled Shallots- New Food To Me

There are many bloggers out there that are well versed in the French way of cooking... I am not one of them:@) I picked up some shallots for my New Food To Me post and was disappointed by the lack of fun recipes Google brought up. So I modified my Pickled Onions and here we have French-ish Pickled Shallots! I figure shallots, red wine vinegar and thyme would all work within that theme. Shallots have two bulbs per head so that makes smaller rings and they fit on things like cheese and crackers really well. I've been popping them like M&M's but they'd be great topping anything from a burger to a casserole!
 Side note: Have you tried Ritz Everything Crackers-Garlic, Onion, Poppy Seed and Sea Salt... 
OMG, they are dangerously good! Found mine at Walmart.
The half empty (half full?) jar:@)

French-ish Pickled Shallots
3oz shallots, peeled and cut into 1/4" thick rings
3/4 C red wine vinegar
1/4 C water
1 tsp sugar
1/2 tsp salt
1/8 tsp dried thyme
3 whole peppercorns
  1. Place shallots in a sterile half pint canning jar.
  2. Bring everything else to a boil, reduce heat and simmer for two minutes.
  3. Pour brine over onions spooning as much of the herbs/peppercorns as you can into the jar.
  4. Let cool on the counter, cover and keep refrigerated. Can be eaten right away, but best by day two.
Avoir un jour heurex:@)

My New Foods List:
(If my sons happen to read this... relax! I still promise fairly "normal" Sunday dinners...)
hominy ~ artichokes ~ fish sauce (I'm scared) ~ almond paste ~ oyster sauce (scared again) ~ gorgonzola ~ dates ~ brisket ~ parsnips ~ adobo ~ meringue powder ~ goat cheese (I'm told to be scared) ~ souffle ~ red velvet anything ~ curry ~ capers ~ chow chow ~ pot stickers ~ pho ~ ponzu sauce ~ fondant ~ fire roasted tomatoes ~ Gruyere ~ Quinoa ~ Tetrazzini any kind ~ Divinity ~ Meyer lemon ~ lemon curd ~ leeks ~ shallots


Wednesday, February 26, 2014

Woven Barbie Chair from Recycled Plastic Milk Carton-Tutorial

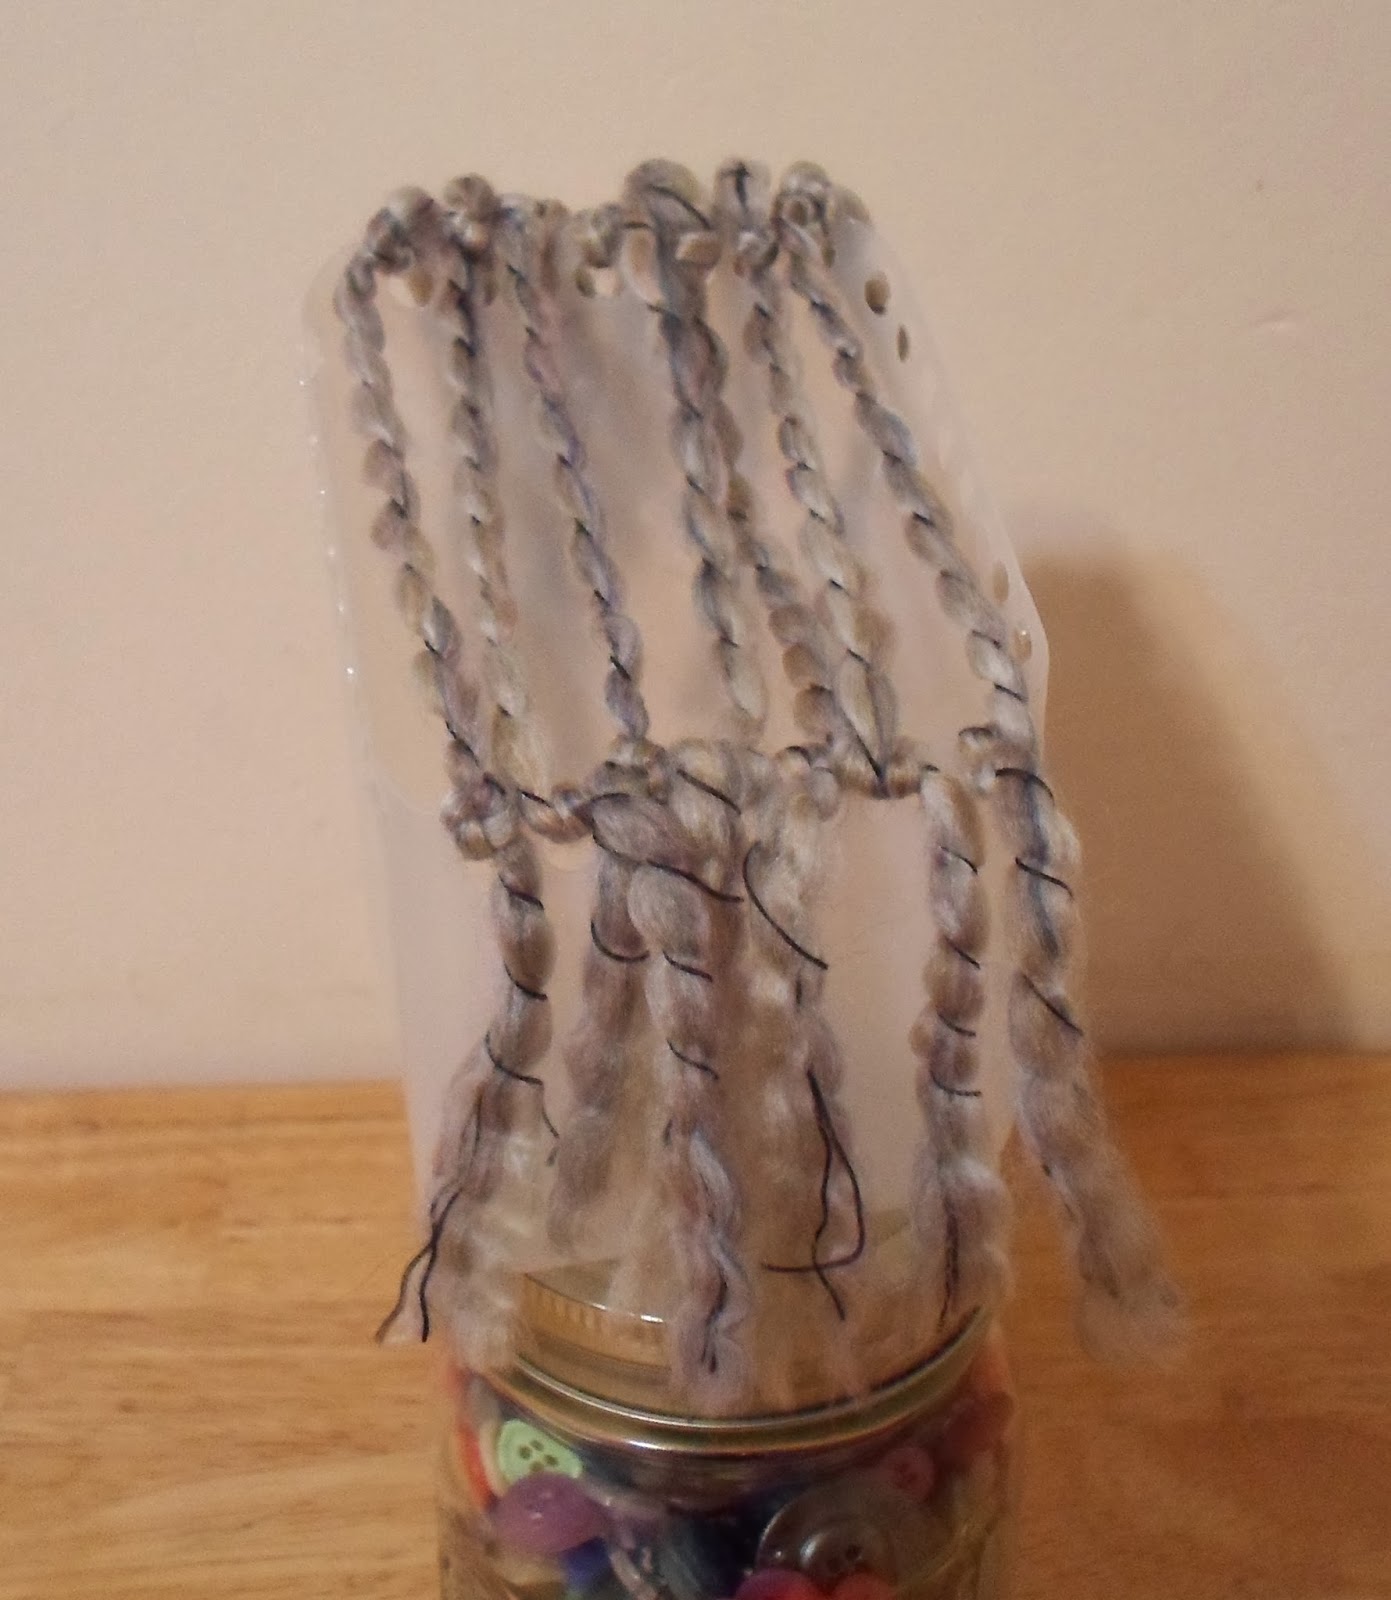
Do you remember papasan chairs? They were my inspiration for this Recycled Milk Bottle Barbie Chair with Woven Seat. The seat can be made from yarn or strips of fabric. I decided to weave it since anyone (especially kids) could do that, another option would be to crochet the seat, just keep decreasing until you get to the center. The hardest part is punching holes in the plastic, especially if all you have is a cheap metal paper punch. Kids would get discouraged quickly so I suggest starting them after that point and just let them tie on the yarn and make the seat. This would be another fun sleep-over project if you can gather enough quart milk cartons:@

This is a neat project for crazy bulky yarns (mine is from the AC Moore $1 bin again) but I think doubled up worsted weight would work fine in a pinch. This really is a cute little chair folks, the pics don't do it justice.
 Pin It
Woven Barbie Chair from Recycled Plastic Milk Carton
  • Measure up the front 2 1/2", draw a line.
  • Measure up the back of the chair 4", draw a line.
  • Draw a diagonal line from the back to the front on each side.
  • Cut out the chair, I used Kuhn Rikon snips but think an Exacto knife would work too. 
  • Make holes all around the the plastic, you want the same number of holes on each opposite side. To make it a little easier on my hand I did wear a leather glove while punching the holes. Notes: I'm not the best of planners and just began punching so my holes aren't very evenly spaced. I ended up with 7 holes across the front and back. 9 holes up each side. 
  • I decided to knot my yarn to each hole allowing the cut ends to hang down covering some of milk carton. 
  • Cut 16 pieces of yarn that are 12" long. (I gave myself some wiggle room, you could make them shorter if you want to save some yarn.) 
  • Push the yarn thorough a hole in the front, let it hang down to cover the milk carton and double knot it. Find the matching hole in the back. Now you don't want to pull the yarn tight, we want to create a "sling like" seat... So leave it a little slack.
  • Double knot a string of yarn to a top hole on the side and begin weaving it over and under the strings to the other side. Leave it a little slack and tie it off when you get to the other side. If your first string starts out by going over, make the next hole down start out by going under... Continue until the seat is completely woven (think hammock:@) 
Wa-La, a Barbie seat!

At this point you have a functional seat and the rest is up to the budding interior designer... She can leave the yarn hanging long, trim it to about 1", fray it if interested, tie on beads, or maybe even glue it to the milk carton so it looks neater... Anything goes. The long shaggy look kinda reminds me of a chair with an afghan thrown over it, so I left mine like that.

Monday, February 24, 2014

Macaroni and Cheese Stuffed Jalapenos

As soon as I saw Mac and Cheese Stuffed Jalapenos over at Bloggy Buddy Jenna's I knew I'd be making them! She wrapped hers in bacon and grilled them (lucky girl! No grilling for me yet). I used the oven and didn't have any bacon -no idea how that happened- so I just added a little breadcrumbs to the top. What's the red on the back two you ask??? Have you ever added hot sauce to mac-n-cheese? Oh Momma, that's some good stuff:@)
Pin It
You can use leftover homemade or your favorite frozen macaroni and cheese... 
No idea how the blue box would work but I'm guessing that's best saved for the kid's lunch:@)
This is a great flavor combo folks, don't hesitate to try it!

Macaroni and Cheese Stuffed Jalapenos-adapted from The Painted Apron
  • Remove seeds and membrane from the jalapenos, generously stuff them with M&C, sprinkle with breadcrumbs.
  • Bake at 375 degrees for about 16 minutes. Finish under the broiler to brown up the tops.
  • Drizzle with hot sauce if desired.
  • Please stop by Jenna's to see the recipe with bacon cooked on the grill.
Eat well and have a happy day:@)

I'm Joining:
Full Plate Thursday

Sunday, February 23, 2014

Ribbon Shamrocks-Ornaments, Garland or Barrette Embellishments

I immediately bookmarked these cute little Ribbon Shamrock Ornaments for my feather tree! This is an easy project that the kids could help make and there's no limit to how the shamrocks can be used, napkin rings anyone??? I knew I wanted smaller ornaments so, I used 1/4" regular ole craft ribbon and cut it 2" long. As a point of reference, this made the whole clover (excluding stem) 1 1/2" long. And it's always fun to add a little bling-beads, sequins or a button look cute in the center.
 Pin It
I'd like to thank Potlucks on the Porch for a great picture tutorial! Stop by HERE to see how easy this fun St. Patty's Day craft can be. The only thing I did differently was, I didn't bother sealing the ends of the ribbon.

Here are a few more Shamrock Craft ideas from Pig In Mud, click the name for the posts:

Saturday, February 22, 2014

$1 Flower Frog Lids for Mason Jars!

I stopped by Target this morning and couldn't believe it when I saw Flower Frog Mason Jar Lids in their $1 bin! I couldn't grab one fast enough, that's a great buy. In case you're not familiar, Flower Frogs help keep your flowers upright in the vase instead of flopping to the sides. And did you see that Ball came out with limited edition green mason jars this year? They'd be really pretty holding flowers...
 Now I just need some daffodils to put in the jar...
Are you listening Mother Nature???

Have a happy day:@)