Monday, March 31, 2014

Single Serving Chocolate Chip Cookie Recipe

In a perfect world I would have had a bag of chocolate chips in the cabinet and made a batch of cookies for the folks at work. We're in the middle of a software conversion, everyone's been working weekends and just a tad... stressed. But I only had a handful of chips, so I did the next best thing and made some cookies for myself:@) If you just want a few cookies this is a great recipe, I used my counter top oven and ended up with three cookies that were about 3" round.
They made for a nice little coffee break!

Single Serving Chocolate Chip Cookie-adapted from No. 2 Pencil
2 Tblsp butter, softened
2 Tblsp brown sugar-I used 1 Tblsp
1 Tblsp sugar
Pinch salt-I didn't use
1/4 tsp vanilla
1 egg yolk
1/4 tsp baking soda
1/4 C A/P flour
3 heaping Tblsp chocolate chips-I had less and just tossed in what was left
  1. In small bowl mix butter, sugars, salt and vanilla by hand.
  2. Add yolk, mix well.
  3. Add baking soda and flour until combined. Stir in chips.
  4. Bake at 350 degrees on parchment paper for 8-10 minutes or until done.
  5. Let cool (or not:@) and eat.
Enjoy a cookie and have a happy day:@)

Saturday, March 29, 2014

Easter Basket for Barbie from Egg Carton

Here's a fun craft to do with the kids, these Barbie Easter Baskets couldn't be easier and are just too cute! The best part is, even the youngest girl can help make them. Simply cut the cup out of the egg carton and square up the top a bit. From there you just need glue and some pretty/blingy items from your stash. And of course the Easter baskets would be fun to use in any craft or vignette with smaller figures.
You can cover the basket in ribbon, scrapbook paper or paint. Additional embellishments could be rick rack, pipe cleaners, ruffle trim, stickers, feathers, flowers, glitter or anything else you may have or can think of.
Pin It 

Notes:
  • After you cut the cups out of the egg carton and square the edges up, they aren't very deep. I used 5/8" ribbon and it worked well for mine. 
  • If desired, trim ribbon to lay on the flat part (bottom) and glue it on. Then I cut four pieces to glue to the sides (this was easier than trying to deal with making one long piece of ribbon lay flat since the sides of the egg carton are at an angle). 
  • The handle is a pipe cleaner glued to the inside of the egg cup.
  • At this point it's all about trim and embellishment!
  • I think Jelly Belly's or Tic Tacs would be cute in the basket.
Easter is April 20th this year so there's still plenty of time to empty an egg carton and create some memories!

Friday, March 28, 2014

Got a new apron!

I treated myself to a silly new apron and this pretty much sums up how I've been feeling lately...
Can you relate?
I think I need to recruit some Minions!

Have a happy day:@)

Wednesday, March 26, 2014

Bunny Hop and Swingin' Chenille Easter Spoolie Ornaments

100 years ago... I bought a huge bottle of big clunky/chunky pink glitter and decided to use some of it on this Bunny Hop Spoolie Ornament:@) I went by the "if a little bling is good, lot's of bling must be better" theory... It's about 4" tall and looks great on the Easter tree! (Pics were taken outside for clarity) The ornament is made from: a used vintage wooden thread spool that had no label or engraving on it, some perfect for Easter pink and purple ribbon and the bunnies were plastic food picks from Walmart last year (the pick part snipped off cleanly with wire cutters).
Pin It
I also made a Chenille Bunny on a Spoolie Swing using a pink "gem" for the head. I'm really trying to only use items already in my stash. The fun multi-colored purple glitter (trust me, it's purple/pink/gold multi-colored...) was from a Halloween variety pack marked down to 60¢ at Michaels. Lovin' the way her hands curl around the swing ropes!
So there are my two new sparkly ornies and I'm hoping to make more, stay tuned...

Have a happy day:@)

I'm Joining:
The Wildly Original Linky Party
Link Party Palooza

Monday, March 24, 2014

Bunny Butts!

No doubt about it, Easter baking and sweets often lead to Bunny Butts! They are so cute and always make me smile, so I thought I'd share a few variations... Ma found some fun cupcake liners and picks at Walmart, I added a white pom-pom for the tail:@) They have a great upside down bunny face on the liners, I suggest baking the cupcakes in white papers and setting them in the decorated papers for best presentation.

Is this the Bunny Butt Cake that started it all??? By bettycrocker.com.

Here is an extremely detailed tutorial for Bunny Tail Cake Balls from RoseBakes.com!

Purple Chocolat Home made these cute Bunnies in the Grass Cupcakes. Love the fur!

Bunny Butt Cookies by HungryHappenings-No bake and totally adorable!

Cute Bunny Butt Candy Pops by Kitchen Fun with My 3 Sons.

Or how about some nice hearty Pancakes... Girl Versus Dough made these yummy ones.

Oh yea, when you look this good from this angle, life is good:@)

Saturday, March 22, 2014

Creamy Garlic Noodles

Disclaimer: There's so much fat in this recipe I hope I don't get hate mail from anyone's cardiologist:@) ~But~ if there is room for a little creamy indulgence in your diet I think you'll love this! With olive oil, butter, heavy cream, Parmesan cheese and six cloves of garlic, these Creamy Garlic Noodles live up to their name! Everyone raved about them at dinner...
Notes:
  • I've made this a couple times and you do want to use thinner pasta. I used large bow-ties the first time and they took way too long to cook. This was thin spaghetti and it worked better.
  • It does call for a lot of garlic, especially if your cloves are bigger. You know your crowd, cut back a bit if needed.
  • Do yourself a favor and sprinkle the parsley over the top instead of dumping it into the pot in one big clump... Take it from someone that spent time trying to break up that clump the last time...
  • This recipe is easily cut in half.
  • It's best served immediately.
  • I believe this is supposed to mimic one of the side dishes that come in a box, only you can pronounce everything in this one:@)
Creamy Garlic Noodles-from Plain Chicken
2 tsp olive oil
6 cloves garlic, minced
2 Tblsp butter
1/4 tsp salt-I didn't add this
1/2 tsp ground pepper
3 C chicken stock-I used water and Better Than Bouillon
1/2 lb angel hair pasta-I used thin spaghetti
1 C grated Parmesan cheese-I used shredded
3/4 C heavy cream
1 Tblsp dried parsley
  1. In large pot heat olive oil over medium-low heat. Add garlic and stir for 1-2 minutes.
  2. Add butter, S&P and chicken stock. Bring to a boil.
  3. Add pasta and cook for 4-5 minutes (or until just about at your desired level of tenderness). 
  4. Reduce heat and add the parm, cream and parsley and stir until the cheese is completely melted.
  5. Remove from heat and serve immediately.
Eat well and have a happy day:@)

I'm Joining:
Mix It Up Monday
Full Plate Thursday

Friday, March 21, 2014

Napkin Rings as Easter Ornaments or Decorations

I have a new 6' skinny tree to play with (thanks Ma:@) and thought I'd bring it out for Easter. In an effort to use what I have I added Napkin Rings as Ornaments and do like that idea! They were $1/set flea market finds and honestly never made it to my table, this way I see and enjoy them every day. I might tie a sheer ribbon through the hole and into a bow on top, still kicking that idea around...
The white porcelain rabbits shine and reflect the lights beautifully and the shrimp colored shell flowers work so well with Easter colors.
Since this is the first year for a bigger Easter tree it will be a work in progress, stay tuned...

Have a happy day:@)

Wednesday, March 19, 2014

Chicken Pizza with Sweet Baby Rays Honey Chipotle BBQ Sauce

Sweet Baby Ray's Honey Chipotle BBQ Sauce was new to me so I thought I'd whip up a pizza and give you a quick review:@) As with all Sweet Baby Ray's products, it really does live up to the "sweet" in the name, that's the first thing I noticed. Then the sauce has the "normal" balanced chili powder flavors you'd associate with BBQ, and I think the chipotle adds a smoky taste without the hickory flavor. If you're afraid it might be too hot, don't be. There's barely just the slightest bit of heat that comes after you taste everything else. My Southwestern foodie friend says there's no heat, it just has a great taste!
For my pizza: I started with a homemade crust laid on a heavily corn meal sprinkled pan. It was liberally topped with the Honey Chipotle BBQ sauce. Then I added a layer of colby jack cheese, topped that with leftover chicken that was chunked and drenched in the BBQ sauce. Then came diced onion and cleaned/sliced jalapenos with a final light dusting of cheddar cheese. My favorite bites had the fresh crunchy jalapeno, so I'd add a lot more the next time. I baked it at 425 degrees for about 12 minutes, bake longer if needed.
This was a very enjoyable lunch that I wouldn't hesitate to make again! I did a similar pizza with Sweet Baby Rays Raspberry Chipotle BBQ Sauce: chicken, onion, green bell pepper and mozzarella cheese, that was great too.

Have an ooey, gooey happy day:@)

I'm Joining:
Full Plate Thursday
Foodie Friday

Monday, March 17, 2014

Light Rye and Caraway Seed Dinner Rolls

Happy St. Patrick's Day everyone! For our hearty corned beef and cabbage dinner I decided to change up our favorite classic dinner rolls and turn them into Light Rye and Caraway Seed Dinner Rolls. This turned out to be a good decision! The smell as they were baking was amazing and everyone really enjoyed the flavors. The rolls paired very well with this meal:@)
As you can see they were soft and squishy and that was very nice, especially for rye bread!

Light Rye and Caraway Seed Dinner Rolls
Up to 2 C A/P flour-start with 1 1/2 and add more if needed
1/4 C rye flour
2 Tblsp sugar
1 envelope (2 1/4 tsp) rapid rise yeast
1 tsp caraway seeds
1/2 tsp salt
1/2 C milk
1/4 C water
2 Tblsp butter
  1. Combine 1/2 C A/P flour, rye flour, sugar, yeast, caraway seeds, and salt in large bowl.
  2. Heat milk, water and butter until warm (120 degrees), add to flour mixture and beat at medium speed for 2 minutes, scraping sides of bowl occasionally.
  3. Add 1/4 C flour, beat 2 minutes at high speed.
  4. Stir in enough remaining flour 1/4 C at a time to make a soft dough. Knead on lightly floured surface until smooth and elastic, about 8 minutes. Cover and let rest 10 minutes.
  5. Divide dough into 12 equal pieces, shape into balls and place in greased 9" round pan. Cover and let rise until double, about 30 minutes.
  6. Bake at 375 degrees for 18-20 minutes or until done. 
Don't forget to wear your green and have a happy day:@)

Saturday, March 15, 2014

Crochet Duckie Plastic Easter Egg Holder

I decided to revisit my Crochet Bunny Egg Holder Tutorial from last year and made an Easter Duckie Egg Holder using the same pattern. These little egg holders whip up in no time and with Easter being so late this year you can make a whole flock of them:@) His beak is felt, it and the eyes are hot glued on.
I'm lovin' his spiky tail feathers!
Bright shiny pics, spring is coming folks!
Pin It
They can be made with many different types of yarns or materials. I found this funky yellow in the $1 bin at AC Moore. 

Here is the duck and last year's bunny (pattern and picture tutorial HERE) with a little hen I bought at a craft show over 10 years ago. The hen was my inspiration piece. I'm putting up a bigger tree this Easter and will be using these egg holders as ornaments.

If you don't crochet and would like another idea these Foam Easter Egg Holders are easy enough for the kids to help with and come together in no time.

Friday, March 14, 2014

Garlic-Caper String Beans- New Food To Me

My son's girlfriend brought me some capers to try for a New Food To Me post-thanks Rachel! These Garlic-Caper String Beans are bursting with the big assertive flavors of fresh garlic and lemon zest, yet the capers hold their own and bring a fun briny/flowery taste to the mix. While I enjoyed this as a side dish my first bite had me thinking it would be great over pasta! I also feel this would make a good cold pasta salad with chicken for lunch. Any way you look at it, this is a tasty and different way to serve up some fresh string beans:@)
Pin It
Garlic-Caper String Beans-from Food Network
1lb fresh string beans, preferably yellow and green mixed, washed and trimmed
olive oil
3 cloves garlic
2 Tblsp capers, drained
zest of one lemon
juice of one lemon
S&P
  1. Boil beans in salted water until crisp/tender, about 6 minutes-I steamed mine.
  2. Chop the garlic and capers together. 
  3. Add the zest of the lemon and mash everything into a paste-as best you can... They didn't mention adding a sprinkle of salt first, I'd try that next time.
  4. Saute in olive oil 2 minutes-I used at least 1 Tblsp of oil, if it looks dry (and probably will) add more.
  5. Add the lemon juice and bring to a boil. Add the string beans and toss until well covered-about 2 minutes.
  6. Season with S&P.
Eat well and have a happy day:@)

My New Foods List:
(If my sons happen to read this... relax! I still promise fairly "normal" Sunday dinners...)
hominy ~ artichokes ~ fish sauce (I'm scared) ~ almond paste ~ oyster sauce (scared again) ~ gorgonzola ~ dates ~ brisket ~ parsnips ~ adobo ~ meringue powder ~ goat cheese (I'm told to be scared) ~ souffle ~ red velvet anything ~ curry ~ capers ~ chow chow ~ pot stickers ~ pho ~ ponzu sauce ~ fondant ~ fire roasted tomatoes ~ Gruyere ~ Quinoa ~ Tetrazzini any kind ~ Divinity ~ Meyer lemon ~ lemon curd ~ leeks ~ shallots

Wednesday, March 12, 2014

Mustard and Soy Sauce Marinade for Pork Tenderloin

My son told me he's been enjoying adding mustard to meats lately so I whipped up this Mustard and Soy Sauce Marinade for some pork tenderloin. It's nice to have a marinade that uses the great flavor of soy sauce in a way that's totally different than teriyaki or sesame. It was a cool day so I made the tenderloin in the oven and we all loved it, but we also look forward to trying this on the grill! Ya gotta love the pig folks:@) Although I'm guessing this would be great with chicken too...
A fun little tasty tip from Alton Brown, when the meat is done cooking lay it on tin foil and pour 1-2 Tblsp of reserved marinade over it (please don't use the marinade after the raw meat's been in it). Then wrap the meat for a 10 minute rest before serving.

Mustard and Soy Sauce Marinade
enough for two tenderloins up to 2lbs total
1/4 C soy sauce
1/4 C olive oil
3 Tblsp mustard-I used spicy brown, use what you have
2 Tblsp brown sugar
1 large clove garlic-I used the garlic press
Lots of freshly ground black pepper
  1. Mix all, reserve about 2 Tblsp of the marinade, add the pork tenderloin and marinate for at least a couple hours, turning occasionally-I let mine marinate for 5 hours, the longer the better...
  2. Preheat oven to 425 degrees.
  3. Place meat on baking sheet and roast uncovered for about 25 minutes, or until the internal temperature is around 145 degrees (more or less depending on how you like your pork, I just set the timer for 25 minutes, I also baked the meat on parchment for easier clean-up).
  4. Bring pork out of the oven and lay it on a sheet of tin foil, give the reserved marinade a stir and pour it over the pork. Wrap up in foil and let rest for 10 minutes, pour juices over sliced meat on platter. Oh and, keep a spoon handy... You'll want to drizzle some juice on the meat once it's on your plate too:@)
Eat well and have a happy day!

I'm Joining:
Full Plate Thursday
Foodie Friday

Tuesday, March 11, 2014

Strapless Barbie Dress with or without Apron/Peplum-For Any Occasion -DIY

Years ago I shared a link to a tutorial for a Strapless Barbie Dress, it only required a 6" square of fabric and was pretty easy to make. The link to that site has since been taken down, so I thought I'd create my own picture tutorial to show folks how to make my variation of the dress. Because, you know, that's kinda what we do here:@) No sewing machine? This dress should come together in less than an hour sewing by hand. And to help prove that point... For some reason my sewing machine isn't working correctly, so after that one horrendous bottom seam, I completed the dress with a needle and thread.

The dress only requires a 6"x6" square of fabric.
Pinking shears create that zig-zag edge and will help control fraying if you have them.

Iron the top and bottom under 1/4" (or run your fingernail over it a few times to create a crease), hem. 

Turn the fabric wrong side out and wrap it around the doll, pin it closed in back. 

Use pins for the bust dart placement 
(pinch the fabric at the waist long ways under each boob so the dart runs up and down). 

 A second pic in case it helps...

Sew a crescent shaped seam for each dart, approx 1" long. 
Widest at the waist, running off the fabric at bust line and hip.

Fold right sides together and sew a 1/4" seam 3" from the bottom up the back, back stitch.

Fold the rest of the fabric on each side under 1/4", I sewed on a little snap for closure,
I prefer a 1/4" wide strip of velcro the whole length of the opening. 

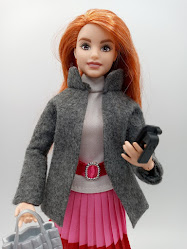
The finished dress before I glued on (using Liquid Stitch) the white trim to cover the top seam:

The back of the dress:


And here's a cute St. Patrick's Day variation:

Written instructions in case they're helpful:
  • The dress only requires a 6"x6" square of fabric. 
  • Press the top and bottom under 1/4", hem. 
  • Turn the fabric wrong side out and wrap it around the doll, pin it closed, then use pins for the bust dart placement (pinch the fabric at the waist long ways under each boob so the dart runs up and down). You'll sew a crescent shaped seam for each dart, approx 1" long. Widest at the waist, running off the fabric at bust line and hip.
  • Optional-Then I sewed the ruffle apron/peplum where her waist is. It only takes about 4" of ruffle. 
  • Fold right sides together and sew a 1/4" seam 3" from the bottom up the back, back stitch. (If you add the apron/peplum be sure to catch the edges of the ruffle in this seam.)
  • Fold the rest of the fabric on each side under 1/4", I used a 1/4" wide strip of velcro the whole length of the opening. If you're using snaps hem each side before sewing them on. 
It's faster and neater with a sewing machine (that works), but this dress didn't turn out bad!
How to make a beaded Barbie necklace HERE.

✂Make something just for fun and have a happy day😊

Sunday, March 9, 2014

Bulb Bunny Easter Ornament/Decoration

This Bulb Bunny Easter Ornament or Decoration is another idea for my used C7 or C9 bulb series. I had one vintage light blue bulb that I thought would be perfect for Easter. The ears are cut out of felt and I glued a pink pipe cleaner to the center to give them some stability. The only thing I'd do differently is to draw the center line for her mouth a little longer... Mine kinda looks like a mustache from certain angles:@)
 This was a quick, silly little craft that I think will look cute on my Easter tree.
Other C9 bulb ornaments: Frankenstein, Jack-O-Lantern, Rudolph.

Saturday, March 8, 2014

Sponge Cake Roll with Jello Flavored Cream Cheese Filling

For some reason I always find myself drawn to Lime Jello around St. Patrick's Day and this year was no different. For this Sponge Cake Roll with Jello Flavored Cream Cheese Filling I used my G-Mom-B's standard jelly roll cake but had some fun with the filling... I started with cream cheese but instead of adding powdered sugar, I used Lime Jello. It added a subtle lime flavor and this light green tint, and since we all know St. Patrick's Day is anything but a subtle holiday, feel free to add more food coloring:@)
Pin It
I cut a shamrock shape out of thin posterboard with an exacto knife to use as a stencil for the green sugar shamrocks on top. Full disclosure: I did find the filling a little grainy, but still tasty.

Sponge Cake Roll with Jello Flavored Cream Cheese Filling
Cake:
4 eggs
1 C sugar-I cut back a bit
3 Tblsp cold water
1 tsp vanilla
1 C flour
1 tsp baking powder
1/4 tsp salt-I don't use this

~Beat the eggs, add sugar, mix until light colored, mix in the water and vanilla.
~Sift the flour and baking powder, add it to the wet and mix well.
~Line a jelly roll pan with wax paper. Pour batter into pan.
~Bake at 350 for 12-15 minutes.
~Remove from oven and roll up (see my jelly roll tutorial HERE). Let cool completely.

Filling:
8 oz cream cheese at room temp
(1) 3oz package of Lime Jello

Optional-1/2 tsp lemon or lime extract
Optional-a little more powdered sugar to taste
Optional-additional green food coloring

(Note: I did not add any optional items)
~Beat cream cheese, Jello, and any optional items until light and fluffy.

Assembly:
~Unroll cake, trim outer edges if desired, slather with filling, re-roll cake, refrigerate... eat.


No one ever got pinched serving cake!
Have a happy day:@)

Friday, March 7, 2014

TGIF!

Here's hoping the work day goes fast...
and the weekend... not so much.
Have a happy day:@)