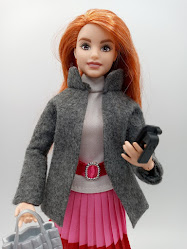
I decided to paint the bodice white and sprinkled clear glitter all over the wet paint for a little bling:@)
The frilly gold trim was in my stash and matched the gold thread in her jeans well.

The tops can be decorated with anything you'd like or have.
Paper Mache Bodice for Barbie-from Dani's Doll Fashion and crafts
- Completely cover Barbie in plastic wrap, wrapping it as tightly against her body as you can.
- Cut strips of paper about 1/2" wide (I used newspaper).
- Dip the paper into a mixture of 1 part white glue to 1/2 part water. Start wrapping the paper around the doll's body. Completely cover the top making a few layers of paper. (Note: the pics are after I already trimmed all of the plastic away from the top.)
- Allow the paper to dry at least 48 hours. Cut a slit up the back of the bodice, remove it from the doll, remove the plastic from the bodice and trim the bodice into the shape you want.
- At this point you can either decoupage some fabric over the paper and allow that to dry, or carefully remove it from the doll and paint the paper.
- I left my back open, Dani says you can make holes and tie up the back closure if you'd like.

Dani has detailed directions and fun decorating ideas on her blog HERE. I encourage you to stop by to see her gorgeous wedding dress!
Make something pretty and have a happy day:@)
PS-While Philly did get snow it was much less than anticipated, my thoughts are with the folks further up the east coast, please take care.
I'm Joining:
Wildly Original Linky Party
I'm Joining:
Wildly Original Linky Party