Showing posts with label Chelsea. Show all posts

Wednesday, December 6, 2023

Dollar Tree Holiday Ideas: Stuffed Marshmallows, Gift Basket Fillers & Barbie...

I thought I'd share some Christmas items and gift ideas from Dollar Tree... These Decorated Stuffed Marshmallows were made using store bought chocolate stuffed marshmallows, they also had cookie stuffed marshmallows. I used Christmas sprinkles, but this works for any occasion, and of course they can be made in team colors too:@) There were 12 marshmallows in my bag, I simply microwaved some candy melts, dipped the marshmallow in the chocolate, then rolled them in sprinkles.

The marshmallows I bought:

Are you putting together a gift basket, or looking for foodie stocking stuffers? I think we're all familiar with Harry & David, I love that DT has a pack of four K-Cups in their hazelnut, praline and cinnamon flavor. There are also bags of ground coffee, and espresso beans are quite the treat... These even come in a dark chocolate variety. These beans would be a nice inexpensive option for cake or cupcake decorating too. 

Speaking of cakes,

Gathering items for a charcuterie gift, or need something fun for your own tray? They have tapenades (and more here), olives, pickles, and some flavored mustards:

And I'll leave you with something for the little ones... If your girl has Barbie there's a chance she has the smaller 6" Chelsea doll too. DT has four different outfits that do fit Chelsea, and they come with shoes and accessories. That's $5 that will keep the kids busy for a while folks:@)

All four fashions:
Not Mattel quality, but still super cute!

🎄Grab it when you see it, and
Have a Happy Day:@)

Tuesday, November 14, 2023

Six DIY Barbie Outfits from One Roll Dollar Store Ribbon

I thought it would be fun to see how many garments I could create from one roll of Dollar store ribbon. As of this post-Six:@) And I still have a 4" piece left over... I started with a thin fabric, wired, 2.5" wide plaid that was 3 yards long. Some projects require a little sewing, some just use hot glue. This was a holiday plaid, there a tons of colors and styles to choose from. This is a long post folks, with lots of detailed directions for crafts.
The girls at the party... 
"Smile" *click*

The ribbon:

The two newest: Shawl is cut to drape over the shoulders, glue trim to the edges and top (or all the way around). I used metallic gift wrap trim, anything goes:@) The Open Front Leggins Skirt (which I love more than I thought I would) is cut 1 1/2 times as wide as the doll's waist. Gather the waist by holding the wire and gently pushing ribbon towards center on both ends. Fold wire over, hot glue craft ribbon over wire and waistband of skirt. Make the ribbon long enough to tie a bow. 

This Gathered Shoulder Party Dress only requires three pieces of ribbon, and of course any extra embellishments you have or would like... If using a plaid ribbon you may want to make sure you match the design on the two front pieces, there will be a seam down the center front of the dress. This is a little half hour project that can be created in any color, for any time of year. Check your stash, you might not even need to leave the house...
I like that in a project😉

What I did (all seams are back stitched):
  1. Cut three approximate 7 1/2 long" pieces of ribbon, pull out wire if using wired ribbon.
  2. Lay two pieces of ribbon right sides together and sew hem 5 1/2" up from bottom of dress. Repeat for the other side of the dress. I sewed as close to the edge as possible. The center piece will be the back of the dress.
  3. Fold bottom of dress over about 1/2" and sew 1/4" hem.
  4. Fold the top of all three pieces over about 1/2" and sew hems. Make the hems wide enough to feed some yarn or ribbon through the hole.
  5. Fold dress right sides together and sew hem from bottom up about 4". I sewed as close to the edge as possible. This will be the center front of the dress.
  6. Feed a piece of yarn, or something else you can gather and tie, through the two hems on the two pieces of the front of the dress. Pull each side tight to gather dress, tie. This creates the shoulders.
  7. Then I took the yarn through the corner of the back of the dress on each side, tie tight.
  8. Decorate top or side of each shoulder with bows if desired.
  9. Decorate center front of dress with bow or other embellishment if desired.
  10. Pick out ribbon for belt, I used velcro to close the belt. A belt will be needed to give the dress some shape.
  11. Dress doll, adjust dress and enjoy the party!
  12. Note: This dress will either slip up over the doll's hips or pull over her head, depending on the doll you use. Option to help make dressing easier: Don't sew one shoulder closed. Use a snap or small piece of velcro.
  13. Fits standard, belly button type Barbie's. But if you use a snap it will fit most Barbie dolls.
Barbie's Wreath = After Christmas clearance earrings.

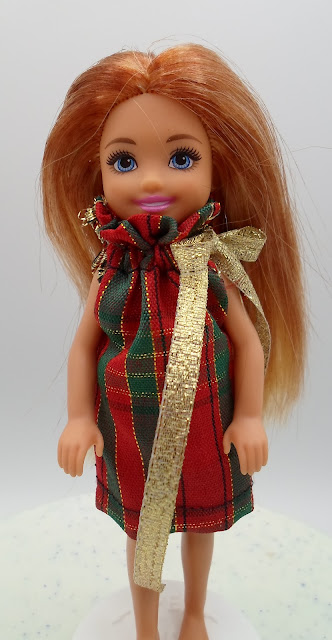
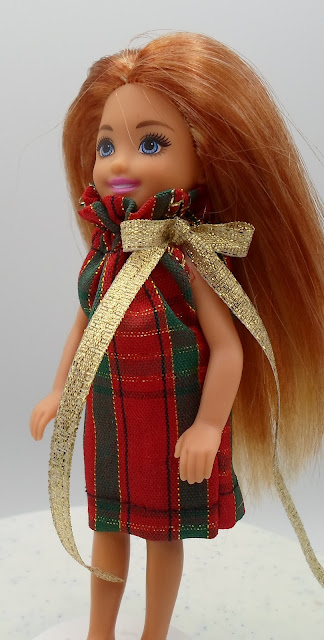
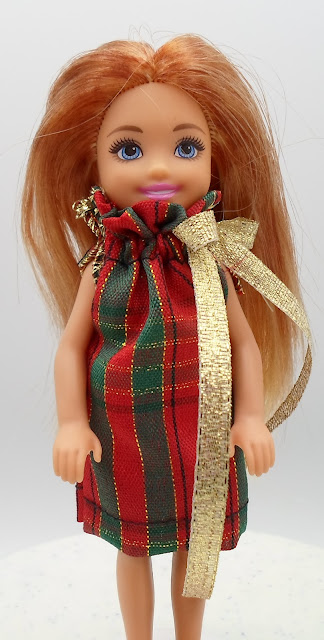
Let's not forget the kid dolls... This Gathered High Collar Party Dress for Chelsea is one of my favorites:@) I was pleased that this small dress was actually pretty easy folks! It's similar to my pillowcase dress, with the high collar being the main difference. Basically it's a tube with ribbon (or yarn) to tie it closed at the neck. Chelsea is the 5"-ish doll in Barbie's world.

What I did:
  1. Cut 2 pieces of ribbon 4 1/2" long.
  2. Pull out wire if using wired ribbon.
  3. For both pieces:
  4. Fold top over 1" to wrong side. Sew 1/4" hem from top of fold straight across ribbon. Sew a second hem below it, give yourself at least 1/4", you'll run yarn or ribbon through this channel later.
  5. Fold bottom over 1/2" to wrong side, or as much as you'd like for desired length of the dress. Sew 1/4" hem.
  6. Place pieces right sides together. Sew hem from bottom up sides, stop about 1 1/4" from the top. Sew both sides. Mine was about 1/4", can sew closer to the sides for a wider dress.
  7. Turn right side out. 
  8. Thread 12" yarn or thin ribbon onto needle, feed through the channel we made at the top. Go through the front piece, then through the back piece. This leaves two loose ends of yarn/ribbon. 
  9. Dress doll from feet first. Place arms between where seam stops and ribbon starts. Pull both ends of the ribbon, scrunch the fabric together creating the collar, then tie the dress closed with a bow on the side of the neck.
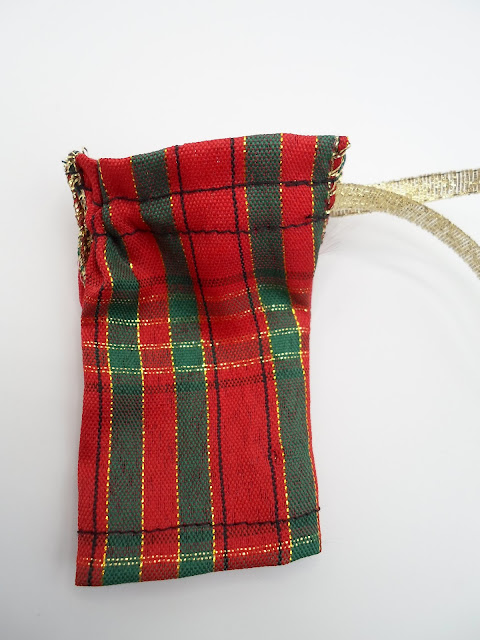
Chelsea says, every girl likes to have a pretty party dress😎

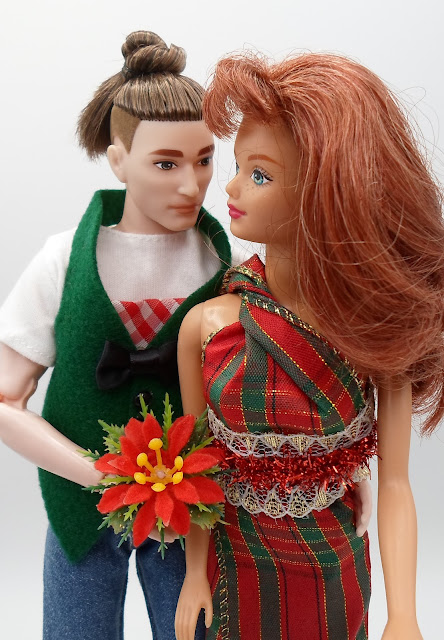
I love the look of this Fancy One Shoulder Ribbon Top for Barbie! This is a no-sew project that literally comes together in minutes, two cuts, two folds, two twists, a little hot glue and you're dressing the doll:@) While I love the holiday colors in this top, plaid always presents challenges for garments... I think a solid color or one with stamped designs might work best. I used a snazzy metallic tinsel ribbon from my stash for the waist band, if you want something blingy that's still easy to find today, diamond mesh ribbon would be fun. 

What I did:
  1. Cut a piece of 2 1/2" wide thin ribbon 7" long. I used the same wire edged ribbon that I made a dress out of here.
  2. Fold the edges over 1/2" on both cut ends, fold to back of ribbon. You can glue them down, I just folded the wire over.
  3. Scrunch up the ribbon at the center point and completely twist it around twice, this is what goes over the doll's shoulder. You'll want the right side of the ribbon to show on both the front and back of the shirt.
  4. Cut 4 1/2" of ribbon for the waistband. Glue one piece of velcro to the right edge of the ribbon. This blouse will open/close on the side for dressing the doll.
  5. Glue the right edge of the waistband to the bottom of the blouse front, but leaving the velcro hanging over side of ribbon (see picture below). My ribbon has the tinsel in the center, that's what I glued to the bottom of the blouse. You can see the pretty lace showing on the doll's skirt.
  6. Overlap the two edges of the ribbon about 1/4" (center point of picture below), glue back piece to waistband. 
  7. Glue other piece of velcro to the other end of waistband (making sure the two edges will stick together).
First piece of velcro hanging over right side.


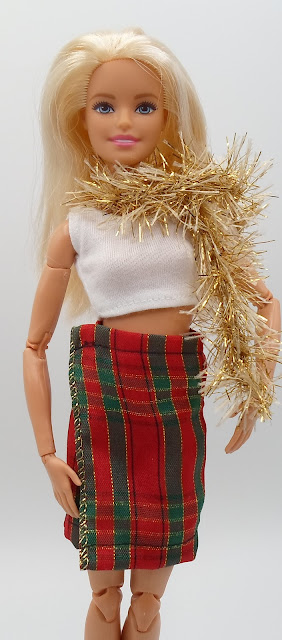
This idea is super simple, a very basic, Wrap Skirt that takes about 10 minutes to make. I also like that this idea only calls for five straight seams, making it a nice easy project for young sewers. Again, plaid can sew-up a little wonky and if you're like me, it might bug you that the lines aren't always exactly straight. Solid or stamped pattern is best.
I like this picture and wanted to share a sweet moment between the dolls😉 They look like the best dressed couple at the Christmas party this year! And you could use a little piece of the plaid ribbon as the insert on Ken's vest too... How to make a no-sew holiday felt vest for Ken here.

Here's a shot of the skirt:
Sparkly scarf = Eyelash yarn, large crochet hook and loose chain stitch.

What I did (all seams are back stitched):
  1. Cut three pieces of 4 1/2" long ribbon (my ribbon is thin, somewhat sheer and 2 1/2" wide). Pinking shears would help control fraying.
  2. Pull out wire if using wired ribbon.
  3. Lay two pieces of ribbon right sides together and sew 1/4" hem up long side of skirt. Repeat for the other side of the skirt. The center piece will be the back of the skirt.
  4. Fold bottom of skirt over about 1/2" and sew 1/4" hem.
  5. Fold top of skirt over about 1/2" and sew 1/4" hem. Please see pic below.
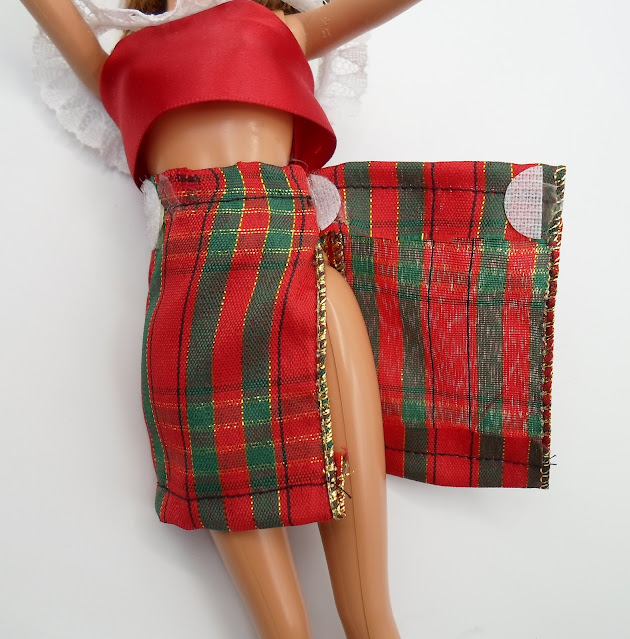
  6. Glue velcro closure for waist in two spots. It's best to just gauge where this should be by wrapping the skirt around your doll. One closure where the ribbon meets around the waist the first time, then another piece to secure the double wrapped flap. I used Dollar Store velcro, if you have a thinner velcro more suited to doll clothes it would lay flatter at the waist. Please see pic below.
Sewn together:
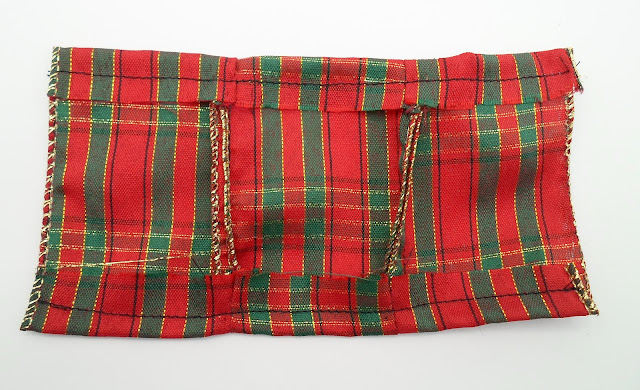
Velcro placement:
Wrap around doll-done:@)

So there you have some ideas to help fill a rainy afternoon, or a few days off from school. I'm sure your girl would love to pick out some pretty ribbon, and help create a wardrobe for Barbie!

✂Make something just for fun, and
Have a Happy Day:@)

Saturday, February 19, 2022

ReView: Sweet and Sour Beef Stew-Instant Pot or Slow Cooker & Hooded Cape for Kid Dolls (Barbie)

Looking for a substantial meal that's a little different? Want a new recipe to try in your Instant Pot? This Sweet and Sour Beef Stew was a big hit at Sunday dinner and just might be added to our menu tomorrow:@) It's a heartier, stick to the ribs version of it's oriental cousin and perfect for a cold winter day. Don't hesitate to give it a try folks, pressure cooker, slow cooker or stove top, this one's a winner.

A couple weeks ago I made a hooded cape for Barbie, I thought it would be fun to make one for Chelsea and Kelly too:@) Free patterns here.

Make something just for fun and have a happy weekend:@)

Saturday, December 4, 2021

ReView: Christmas Tree Cheese Ball, Breakfast Sausage Meatballs & Chelsea Dress from Ribbon

Tis the season for noshing and party munchies so I thought share how to make a Christmas Tree Shaped Cheese Ball. It's easily shaped by using a disposable icing bag, and 'greened' up with fresh herbs. It's the little things that help make holiday memories folks:@) 

And since we're all looking for ideas, I thought I'd remind everyone about this oldie but goodie... Jimmy Dean Sausage Cheese Balls-very popular at parties!

And the dolls are getting into the spirit too... This gathered high collar party dress for Chelsea is another quick craft, and I have to say, one of my favorites so far:@) I was pleased that this dress for the small kid dolls was actually pretty easy folks! It's similar to my pillowcase dress, with the high collar being the main difference. Basically it's a tube with ribbon (or yarn) to tie it closed at the neck.

Chelsea is the 5"-ish doll in Barbie's world.

What I did:
  1. Cut 2 pieces of ribbon 4 1/2" long.
  2. Pull out wire if using wired ribbon.
  3. For both pieces:
  4. Fold top over 1" to wrong side. Sew 1/4" hem from top of fold straight across ribbon. Sew a second hem below it, give yourself at least 1/4", you'll run yarn or ribbon through this channel later.
  5. Fold bottom over 1/2" to wrong side, or as much as you'd like for desired length of the dress. Sew 1/4" hem.
  6. Place pieces right sides together. Sew hem from bottom up sides, stop about 1 1/4" from the top. Sew both sides. Mine was about 1/4", can sew closer to the sides for a wider dress.
  7. Turn right side out. 
  8. Thread 12" yarn or thin ribbon onto needle, feed through the channel we made at the top. Go through the front piece, then through the back piece. This leaves two loose ends of yarn/ribbon. 
  9. Dress doll from feet first. Place arms between where seam stops and ribbon starts. Pull both ends of the ribbon, scrunch the fabric together creating the collar, then tie the dress closed with a bow on the side of the neck.

Chelsea says, every girl likes to have a pretty party dress😎

~Have a happy weekend🎄

Saturday, August 29, 2020

Saturday ReView: Freezer Dill Pickles and Felt No-Sew Jumper for Barbie

I know gardens are beginning to wind down now but wanted to share these Freezer Dill Pickles HERE in case you had some extra cucumbers to use up. They are nice because they don't require canning and can be frozen in bags, mason jars or plastic containers. It would be good to have a few of these tucked away for sandwiches on a cold day. This is an easy recipe that calls for dried dill and really doesn't require much work:@)

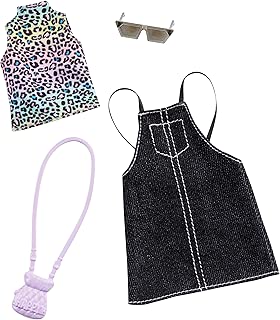
I always run through the Barbie isle at the stores looking for inspiration and I've held the Mattel outfit shown below in my hand several times. I like the bibbed skirt, but didn't really think I needed to buy the outfit to be able to make a simple pattern. Well, the other day it was at Dollar Tree so home it came! This is an easy project that comes together fairly quickly, one girls can most likely make for themselves. An added bonus, Barbie says bibbed skirts are in style this year, we see them in both the women's and girl's departments at the stores.

The kids dolls:
Chelsea has a little diamond mesh bling on the bib and as straps,
and Kelly is getting ready for Halloween😎

Mattel's version has side seams, mine is one piece, with one seam in the back and added straps. I used hot glue for the back seam, but it can also be sewn closed. The best fabric choices for no-sew are felt or flannel. As we're coming to the end of summer, I've made all four of mine from felt. The skirt is designed to be loose and slip up over the doll's hips, no velcro or snap closure needed. 

My inspiration:

Pattern for Standard (Belly Button) Barbie:

Curvy Barbie:

Chelsea:
(You might want to flare the sides a tad more.)

Kelly:

This would really be a fun project for a sleepover craft or birthday party... Felt is about 25¢ a sheet, you can get several dresses from one sheet. You could even make the dresses ahead of time and just let the girls decorate them.

Directions:
Cut one from non-fraying fabric. Aim to cut on the ~outside~ of the black line.
Using straps of choice (the same fabric, ribbon, cording, thin ruffle, or any trim embellishment), hot glue to inside of fabric.
Notes: These felt straps are approximately 5" long x 1/4" wide. The cording on the tan skirt is approximately 13" long and the center was glued to the top center of the bib, long sides left loose, cut ends secured with clear nail polish to prevent fraying. The cord gets tied behind the doll's neck. 
Best suggestion: Lay whatever you are using over the dolls shoulders and cut to length.

Glue or sew back seam. I simply laid one side 1/4" over the other. 

Dress doll, drape the straps over her shoulders, trim if necessary (but remember the idea for this is to be a skirt that lays a bit lower and looser on her hips). Hot glue to front of skirt.
For Chelsea I glued three strips of diamond mesh to bib, cut the middle strip out to create straps and laid them over her shoulders, glued to inside back of skirt. 
For Kelly: I glued the 1/8" ribbon straps to the inside of the bib first, then laid the ribbon over the shoulders and glued to inside of back of skirt.

Embellish as desired with buttons, sewing trim, hand sewn seams, add pockets, appliques etc.

Make something just for fun and have a Happy Weekend:@)

Saturday, April 4, 2020

Saturday ReView-Two Ingredient Bisquick Biscuits, Peeps for Barbie & Easter Bunny Treat Topper DIY

Just popping in with a reminder about an oldie but a goodie... Don't forget about that box of Bisquick that's in the cabinet or fridge, these Two Ingredient Bisquick Biscuits whip up in no time. And while maybe not the prettiest bun, those shaggy edges make nice crunchy bites. These are a great addition to dinner, or with some jam for breakfast:@) If you're more fond of those famous seafood house biscuits, I have a link HERE, using flour, and an easy Bisquick substitute HERE.

Bisquick Drop Biscuits-Recipe easily scaled down
2 1/4 C original Bisquick
2/3 C milk-I used Half and Half
Stir together until soft dough forms, drop by spoonfuls onto baking sheet, bake at 450 degrees 8-10 minutes or until golden brown, serve immediately.

I know folks are divided, seems either you love or ~not love~ eating Peeps... But you have to admit, they are an Easter icon. So I thought it would be fun to whip up a little stuffed Peep toy for Easter. This is a simple project that only requires some felt and either (the correct) glue or a needle and thread.

Since I didn't have matching thread I thought I'd glue mine together... 
After a few failed attempts, the best glue was Aleene's Turbo Tacky Glue. 
But... It would just be easier, and faster, to sew it.
I used a Sharpie for the eyes and nose, 
you could sew on small black beads or sew on French knots too. 

My stuffing is a thin 1/4" wide piece of felt folded in half.
You could make yours thicker if desired, and you'll be able to get more stuffing inside if you sew it.

Here's a pattern I found on-line,
Mine is about 2 1/2" long stuffed.

And I'll leave you with this cute Peeking Bunny Treat Topper that's simply made from 
pipe cleaners and googly eyes.
Just a little something to make us smile-instructions HERE :@)

Please take care, stay busy, and have a happy day:@)

Wednesday, January 22, 2020

Emoji Dresses from Balloons for Chelsea and Kelly Dolls (Barbie DIY)

These Emoji Dresses from Balloons for Barbie play come together in minutes and make a cute little ~happy~ outfit:@) I used 12" balloons and they fit the Chelsea and Kelly size dolls well. I'm still working on projects trying to use up one package of multi-colored balloons so I drew the faces on. I did see packs of smiley face yellow balloons at Dollar Tree if you need several for a girl's birthday party or sleepover craft.
 
Directions:
  1. Buy smiley balloons or draw emoji face on balloon. (I spread my balloon over a Christmas ball ornament to make a smoother surface to draw on.)
  2. Cut neck off of balloon.
  3. Cut two small 1/4" holes for arms.
  4. Cut hole in opposite side from neck.
  5. To dress doll: Stretch balloon open and start dressing from the feet.
  6. I added the heart sticker eyes after the doll was dressed.
  7. Optional matching headband on Kelly doll: Cut off the rolled part of the balloon and stretch it over her head.
Dollar Tree balloons:

Cute:@)

Make something just for fun and 
Have a Happy Day😉